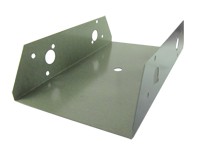
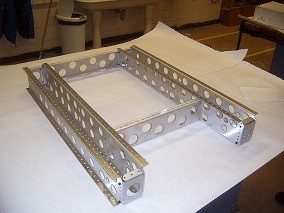
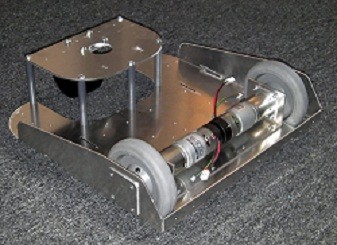
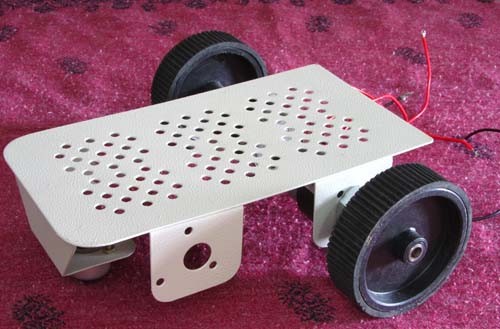
Ready made chassis that are available in the market (like the one above) are really good, cheap and for all you know they might have been subjected to an R&D before fabrication. In spite of all these advantages I still see the following issues with ready made chassis.
- They are not available in the shape and size that I feel is fit for my robot. Most of the time I am forced to restrict the robot size to the size of the chassis that is available.
- They do not give the flexibility that a custom design can have.
- You cannot cast your artistic touch (if you have one that is) over the design.
- Above all, they are not unique. If you go for an event with high hopes and find that there are a dozen robots that looks exactly like yours, then you will understand the importance of being unique.
So the only other alternative is to build your own chassis. There are wide varieties of materials to choose from when it comes to building your own chassis. I have listed out the commonly available materials over which robots are built.
- Wood: Wood is the easiest and cheapest material that is also strong enough to support the weight of a large robot. Most of the time robots are built on wood. Wood is preferred because it is easily available. You can walk into a building under construction and you will have enough and more wood for all the robots you can possibly build in a month’s time. The reason they are chosen is that they are really easy to work with.
- Plastics: Most people like to use acrylic Plexiglas sheets in place of glass for transparent applications and small robot bases because it is easy to drill and tap and can be cut with a jig saw. PVC (pipe) can be useful for projects where lightweight strength is needed. Plexiglas, PVC, and most other plastic can be formed or shaped using heat gun.
- Metal: It is hard to beat metal for building a robot frame. It is extremely strong, durable, and can be joined by either welding or using bolts/nuts. Cutting is a bit more difficult, requiring either a hacksaw (and some elbow grease) or a reciprocating saw with a fine-tooth metal blade. Once built, a metal frame will last for years and will not warp or change shape.
- Fiberglass: Fiberglass is an outstanding material for creating specific shapes that would be nearly impossible to make from metal or wood. It is also extremely strong and rigid once set, as well as waterproof. The process involves laying a fiberglass cloth and then applying a two-part resin on top of the cloth. It only takes about 1 hour to harden, but it does make some strong fumes.
Though wood has more advantages this post will cover the use of acrylic as the material for building chassis. Acrylic is available in all shapes and sizes with a wide range of thickness to choose from. One other compelling factor is that it available in vibrant colors which gives a new visual appeal to you robot.
Cutting the acrylic sheet:
One of the most important tool you would need for building robots our of acrylic is a saw. Now don’t ask me the name of the saw, my carpentry skills are limited. All I know is that, you can ask for a saw to cut acrylic and you will most probably be handed this one.

Now that you have seen it, you can never go wrong!! If you happen to know it’s name, leave a comment and I will update the the post. This saw is one of the best investments I have ever made in terms of hardware. The blades are really cheap and come in packs of a few hundreds only. So there is no way that you will run out of ammunition.
This saw can make circular cuts on Acrylic sheets of almost any thickness. Most of the sellers sell the Acrylic sheets with a brown sheet stuck over it to protect its glossy surface. This is really helpful if you want to draw some guiding lines before cutting the acrylic plate which otherwise would have forced you to use a marker to draw the guiding lines.
Here is an image of a plate that I cut out of a transparent, 0.4 inch thickness sheet of acrylic. One half of the image has the brown protective sheet removed and the remaining portion still has the protective coat.

You can see a lot of scratches and drills on the plate, it is due to my improper documentation while doing it. This picture was much later than the actual cutting process :-), in fact this is the only piece that I had along with its left over part so I dismounted it form the black boy for this blog post.
As you can see in the above image I have made a circle and flattened the sides to give it a fancy look. You can come up with some awesome ideas. I planned to design the Blackboy so that it will fit in a box that I already had so that I can easily carry it around with me when I went for some competitions alone. So this box I had was measuring a 21.5cm diameter. I have no clue why they decided to choose such an odd number for its diameter. So I chose 19cm as the diameter for the base plate of the robot. Here is the image of the circular base plate cut out of black 0.4 inch acrylic sheet.

As you can see my craftsmanship has improved over time and I have made it look like a circle (there are some unreleased versions that is nowhere close to being circular) Again this image was also a delayed document so you can see cuts for the wheel and a center cut to allow wires to move from one level of the bot to another without making it look shabby. The next logical thing to do would be to correct the mistakes that you made with the saw.
Filing the jagged edges:

However skilled you are, you invariably tend to make a few goof-ups while cutting the plate. My only advice for this is always make mistakes outside the guide line. That is, while cutting cut the plate from the outside margin of the line so that you can always file your way into the correct position in the line. But if you did it the other way round there is no way to correct you mistakes.. even the best of tools won’t be helpful and the only alternative if you can’t live with it, is to choose a different diameter (smaller obviously) guide line and start over :-).
Hand Drill:

For almost all you applications this drill should be fine. This is really good especially for acrylic. I say this because of the nature of the acrylic material. Let me see if I can make you understand, while drilling from the top side, the bottom side is the most stressed and venerable. This stress on the bottom side increases as the drill bit receded down the plate. And it is maximum when the drill bit is breaking it’s way out of the other side of the plate. While it is breaking out of the other side, if you don’t slow down, the sheet will crack!! and put you back to step ONE . So when you are using a power drill you can’t possible know when your bit will hit a home run… On the other hand your hand drill (wow that rhymes!!) will let you feel the bit touching the other side by a soft glitch in the rotation. Once you break one or two plates you will get a grip of this feel and you will reflexively slow down (it’s more due to fear of breaking than your reflex system.)
Hexagonal spacers:

This is the next most wanted supply you will need and not all hardware shops will have these (at least not down here. Check out your local shops) These give a cool look to your robot and are really useful to hold off the circuitry from the ground plate. The ones shown above are brass and are quite expensive, especially those long ones. There are shops that sell them in stainless steel too but you have to search for them. These are like desserts, you can do without them too, but it gives what you can call, the finishing touch. Here is an image of the touch it gave to my robot,

The mounting and other stuffs, I leave it to you to let your imaginations fly. This type of chassis build is suitable for robots that are meant to be operated in indoor conditions where ground spacing should not be an issue. So don’t have a robot made with acrylic compete for a robo-war or something of that sort.
Otherwise you might have to watch out while screwing up the motors, if you don’t give enough force you bot will wobble and if you give too much force… yes you guessed it!! go back to step ONE, Wish you all the best with your robot.
**Update: ** As requested by Rachith in the comment section I have added the images of the most commonly used/available ready made chassis for robots. Please note that these images are not a part of EmbedJournal and have been collected from various sources.