<?xml version="1.0" encoding="utf-8"?><feed xmlns="http://www.w3.org/2005/Atom" ><generator uri="https://jekyllrb.com/" version="4.3.2">Jekyll</generator><link href="https://embedjournal.com/feed.xml" rel="self" type="application/atom+xml" /><link href="https://embedjournal.com/" rel="alternate" type="text/html" /><updated>2023-05-05T18:10:39+00:00</updated><id>https://embedjournal.com/feed.xml</id><title type="html">EmbedJournal</title><subtitle>Embedjournal is a blog focusing on embedded software/hardware design and a bunch of other - somewhat - related things. Embedded systems play a vital role in our day-to-day lives, even without our knowledge we are using dozens of embedded devices. This journal is dedicated to all enthusiasts and hackers out there.
</subtitle><entry><title type="html">Cross Compilation Demystified</title><link href="https://embedjournal.com/cross-compilation-demystified/" rel="alternate" type="text/html" title="Cross Compilation Demystified" /><published>2018-01-26T05:09:00+00:00</published><updated>2018-01-26T05:09:00+00:00</updated><id>https://embedjournal.com/cross-compilation-demystified</id><content type="html" xml:base="https://embedjournal.com/cross-compilation-demystified/"><![CDATA[<p>Cross-compiling is an integral part of embedded software development. Most established projects adhere to set of well defined contract to achieve this. But still, there are many other (smaller) projects which employ subtle variations to achieve the same effect. Owing to this, a lot of beginners get thrown off guard when enlisted to cross-compile modules.</p>

<p>In this article we will discuss some general principles and methods to adopted in different projects to get an idea of what to expect (and what to provide) in a project. Hopefully, this will in someday help you cross-compile without breaking a sweat.</p>

<div id="section-nav">
  <h3>Table of Contents</h3>
<ul id="markdown-toc">
  <li><a href="#what-is-cross-compilation" id="markdown-toc-what-is-cross-compilation">What is cross-compilation?</a>    <ul>
      <li><a href="#what-is-the-need-for-cross-compilation" id="markdown-toc-what-is-the-need-for-cross-compilation">What is the need for cross-compilation?</a></li>
      <li><a href="#can-you-get-anything-cross-compiled-easily" id="markdown-toc-can-you-get-anything-cross-compiled-easily">Can you get anything cross-compiled easily?</a></li>
      <li><a href="#typical-cross-compilation-process" id="markdown-toc-typical-cross-compilation-process">Typical cross-compilation process</a></li>
      <li><a href="#dependency-resolution" id="markdown-toc-dependency-resolution">Dependency resolution</a></li>
    </ul>
  </li>
  <li><a href="#cross-compilation-techniques" id="markdown-toc-cross-compilation-techniques">Cross-Compilation techniques</a>    <ul>
      <li><a href="#autotools-based-subsystems" id="markdown-toc-autotools-based-subsystems">Autotools based subsystems</a>        <ul>
          <li><a href="#understanding-host-target-and-build" id="markdown-toc-understanding-host-target-and-build">Understanding host, target, and build</a></li>
          <li><a href="#install-prefix" id="markdown-toc-install-prefix">Install prefix</a></li>
        </ul>
      </li>
      <li><a href="#pure-make-based-subsystems" id="markdown-toc-pure-make-based-subsystems">Pure make based subsystems</a>        <ul>
          <li><a href="#exporting-compiler-prefix" id="markdown-toc-exporting-compiler-prefix">Exporting compiler prefix</a></li>
          <li><a href="#exporting-toolchain-path" id="markdown-toc-exporting-toolchain-path">Exporting toolchain path</a></li>
          <li><a href="#exporting-absolute-path-to-cross-compiler" id="markdown-toc-exporting-absolute-path-to-cross-compiler">Exporting absolute path to cross-compiler:</a></li>
        </ul>
      </li>
    </ul>
  </li>
  <li><a href="#guidelines-for-cross-compilation" id="markdown-toc-guidelines-for-cross-compilation">Guidelines for cross-compilation</a>    <ul>
      <li><a href="#allow-make-variables-to-be-overridden" id="markdown-toc-allow-make-variables-to-be-overridden">Allow make variables to be overridden</a></li>
      <li><a href="#dont-hard-code-anything" id="markdown-toc-dont-hard-code-anything">Don’t hard code anything</a></li>
      <li><a href="#verbosely-list-all-dependencies" id="markdown-toc-verbosely-list-all-dependencies">Verbosely list all dependencies</a></li>
      <li><a href="#stick-to-the-generic-stuffs" id="markdown-toc-stick-to-the-generic-stuffs">Stick to the generic stuffs</a></li>
      <li><a href="#dont-over-engineer" id="markdown-toc-dont-over-engineer">Don’t over engineer</a></li>
      <li><a href="#provide-for-more-than-one-way-to-skin-the-cat" id="markdown-toc-provide-for-more-than-one-way-to-skin-the-cat">Provide for more than one way to skin the cat</a></li>
      <li><a href="#documentation" id="markdown-toc-documentation">Documentation</a></li>
    </ul>
  </li>
  <li><a href="#conclusion" id="markdown-toc-conclusion">Conclusion</a></li>
</ul>

</div>

<p>Before we get into the specifics, we will take a detour and explain cross-compilation for the beginners. Those of you who are already familiar with the basics, feel free to <a href="#cross-compilation-techniques">skip the intro section</a>.</p>

<h1 id="what-is-cross-compilation">What is cross-compilation?</h1>

<p>It is the process of building an executable from source with a suitable compiler (<a href="https://en.wikipedia.org/wiki/Cross_compiler">cross-compiler</a>) in one machine that can be directly executed in another. That is, the build and host machines are not of the same architecture (more on these terms <a href="/cross-compilation-demystified/#what-is-the-need-for-cross-compilation">later</a>).</p>

<p>In other words, it is compilation of sources in one architecture that can be run on another with a suitable compiler.</p>

<h2 id="what-is-the-need-for-cross-compilation">What is the need for cross-compilation?</h2>

<p>Predominantly, cross-compilation is used in the embedded world (it is used elsewhere as well) where the host platform (where the application will run) is severely limited in resources. On the other hand, the build machine (usually) has a lot more juice (CPU, GPU, RAM, etc.,) to produce machine code that can be executed directly in another architecture.</p>

<p>These limitations in the host system preclude the possibility of having a compiler on-board and ergo, the need for cross-compilation.</p>

<h2 id="can-you-get-anything-cross-compiled-easily">Can you get anything cross-compiled easily?</h2>

<p>Short answer, no.</p>

<p>It depends on a lot of things. For starters, the software’s author must have had cross compilation in the road map for the project and refrained from using OS/architecture specific constructs.</p>

<p>There are other factors such as, assumptions made on <a href="https://en.wikipedia.org/wiki/Endianness">endianness</a>, <a href="https://en.wikipedia.org/wiki/Data_structure_alignment">alignment</a> or <a href="https://en.wikipedia.org/wiki/Word_(computer_architecture)">word size</a>, that can cause serious breakage in functionality when cross compiled. Going into the details on each of those topics and how exactly they surface is beyond the scope of this article, but Wikipedia has some nice write-ups if you are so inclined.</p>

<p>With that said, there are still a vast majority of small projects, that with little effort can be cross compiled successfully.</p>

<h2 id="typical-cross-compilation-process">Typical cross-compilation process</h2>

<p>In essence, cross-compilation is just a matter of <code class="language-plaintext highlighter-rouge">export CC=some-arch-gcc</code> followed by a <code class="language-plaintext highlighter-rouge">make</code> in the same shell. Although this can theoretically work (perhaps on small projects), the real world isn’t as straightforward as you might expect. Partly, due to the complexity in requirement of the system you are trying to cross-compile.</p>

<h2 id="dependency-resolution">Dependency resolution</h2>

<p>The biggest hurdle in cross compilation is meeting all dependencies of a given software package. In standard compilation, when you come across a build time dependency, it’s just a matter of apt-get/yum install pre-compiled version of that package. This also ensures all dependencies of that package is met: which is <em>actually</em> the most tricky part.</p>

<p>When cross compiling, the task of dependency resolution is left to us. Let’s consider the scenario where you are tasked with cross compiling curl to your target.</p>

<p>You will soon come to the realization that curl depends on openssl and zlib (and more depending on your need). Openssl in turn depends on pcre and some more packages. Now you have to cross compile three (or more) other packages to compile curl.</p>

<p>I’ve had times when I ended up cross compiling a dozen packages when I initially set out for one. Fret not, soon it won’t seem too hard and later it will be part and part of your development life. Now that we have covered the basics, let us jump into the actual topic.</p>

<h1 id="cross-compilation-techniques">Cross-Compilation techniques</h1>

<p>You might be surprised at the number of ways in which you can get something cross-compiled. As explained above, its just a matter of exporting a bunch of variables to your shells environment and then initiating the compilation process. In the following sections we will see some of the popular methods.</p>

<h2 id="autotools-based-subsystems">Autotools based subsystems</h2>

<p>Autotools does put some method to the madness. If you aren’t familiar with autotools, you can get an overall idea in <a href="https://stackoverflow.com/a/26832773/8294130">this stackoverflow answer</a>. The <code class="language-plaintext highlighter-rouge">configure</code> and <code class="language-plaintext highlighter-rouge">config.guess</code> scripts seem to have taken away much of the incoherence and standardized the system. Most of the time, it’s just <code class="language-plaintext highlighter-rouge">./cofigure CC=arm-linux-gnueabihf-gcc</code> followed by the usual <code class="language-plaintext highlighter-rouge">make</code>. Obviously, it comes with a learning curve, that is made a lot simpler if you are familiar with pure make systems.</p>

<h3 id="understanding-host-target-and-build">Understanding host, target, and build</h3>

<p>To work effectively with autotools, you will need to clearly distinguish the terms, host, target and build. Do note that from the compilers perspective, there are some slight variations in the definitions of these terms. For the sake of simplicity we will leave that out for now.</p>

<p><strong>host:</strong> The system that is going to run the software once it is built.</p>

<p><strong>build:</strong> The system where the build process is being executed. When cross-compilation, this cannot be the same as host.</p>

<p><strong>target:</strong> This is a rather confusing option: this specifies where the software being built will run on interacting with another architecture. Simply put, this option is used only when you are building toolchains/debuggers for the host. Confused? well you could read about <a href="https://en.wikipedia.org/wiki/Cross_compiler#Canadian_Cross">the Canadian cross</a>, to get a better picture.</p>

<p>This only exists, or rather has a meaning, when the software being built may interact specifically with a system that differs from the one it’s being executed on (our host). This is the case for compilers, debuggers, profilers and analyzers and other tools in general.</p>

<h3 id="install-prefix">Install prefix</h3>

<p>Of course, <code class="language-plaintext highlighter-rouge">configure</code> can do a lot more that that depending on what all the project has be setup for. One of the most useful argument to configure script is the <code class="language-plaintext highlighter-rouge">--prefix=path/to/install/direcory/</code> this is useful if you are installing to a non-standard path (which you will most of the time in an embedded perspective).</p>

<h2 id="pure-make-based-subsystems">Pure make based subsystems</h2>

<p>Plain GNU Make recipes with no flavors is called pure make based subsystems. Pure make systems are probably the most cluttered method of cross-compilation. This is due to the fact that, the make subsystem doesn’t impose any rules on how things have to be done. As a result, each project came up it’s own way to skin the cat.</p>

<p>But don’t lose hope, it’s not as bad as it sounds. Somehow the community has settled down with some broad rules/methods. But there will still be the occasional outliers who will force you to dig deeper into the makefiles. Depending on the project, you will have to resort one or many of the methods below.</p>

<h3 id="exporting-compiler-prefix">Exporting compiler prefix</h3>

<p>Cross compiler binaries are usually named in the format <code class="language-plaintext highlighter-rouge">arch-platform-abi-gcc</code>. An example of that would be <code class="language-plaintext highlighter-rouge">arm-linux-gnueabihf-gcc</code>. Here we can see that the gcc is prefixed with <code class="language-plaintext highlighter-rouge">arm-linux-gnueabihf-</code>.</p>

<p>You are expected to export <code class="language-plaintext highlighter-rouge">CROSS_COMPILE=arm-linux-gnueabihf-</code> and then perform the build.</p>

<p>Pretty straightforward right? wait, now comes the annoying part. Some projects prefer to export <code class="language-plaintext highlighter-rouge">CROSS_COMPILE=arm-linux-gnueabihf</code>, ie., without the trailing <code class="language-plaintext highlighter-rouge">-</code> character.</p>

<p>Personally, I prefer the one with the hyphen in it as it allows me to do,</p>

<div class="language-make highlighter-rouge"><div class="highlight"><pre class="highlight"><code><span class="nv">CC</span> <span class="o">:=</span> <span class="nv">$(CROSS_COMPILE)</span>gcc
<span class="nv">AR</span> <span class="o">:=</span> <span class="nv">$(CROSS_COMPILE)</span>ar
</code></pre></div></div>

<p>This way, when I don’t export anything to <code class="language-plaintext highlighter-rouge">CROSS_COMPILE</code>,  I end up  compiling for host machine as <code class="language-plaintext highlighter-rouge">CC</code> would evaluate to just <code class="language-plaintext highlighter-rouge">gcc</code>.</p>

<h3 id="exporting-toolchain-path">Exporting toolchain path</h3>

<p>In most places, you don’t really export toolchain path separately. You pass the compiler prefix and the underlying make system expects to find the toolchain in your system’s environment (usually the <code class="language-plaintext highlighter-rouge">PATH</code> variable). But this approach doesn’t scale very well when you have more than one compiler with the same name. Therefore, some projects expect you to explicitly state the toolchain path.</p>

<p>Usually its is called <code class="language-plaintext highlighter-rouge">TOOLCHAIN_PATH</code> but there is no said rule on this. it can vary from project to project you will have to look into the makefile and/or the documentation to see what it is expecting.</p>

<h3 id="exporting-absolute-path-to-cross-compiler">Exporting absolute path to cross-compiler:</h3>

<p>In projects that do not take <code class="language-plaintext highlighter-rouge">TOOLCHAIN_PATH</code>, it can be particularly hard if you have more than one compiler of the same name installed in your computer. One way to deal with this, is to keep only the path to the compiler you plan on using in your environment’s <code class="language-plaintext highlighter-rouge">PATH</code>.</p>

<p>There is also another way to deal with such scenarios: you could pass an absolute path to the cross-compiler to the make system as,</p>

<div class="language-shell highlighter-rouge"><div class="highlight"><pre class="highlight"><code><span class="nb">export </span><span class="nv">CC</span><span class="o">=</span>/opt/arm/gcc-6.3.1linaro-6.3.1-2017.05-x86_64_arm-linux-gnueabihf/bin/arm-linux-gnueabihf-gcc
</code></pre></div></div>

<p>This approach (IMHO) is cleaner as you don’t have to fiddle with the systems <code class="language-plaintext highlighter-rouge">PATH</code> variable.</p>

<p>Now that we have a fair idea of the different practices that are followed, we can lay down some rules/guidelines to make a project cross compilation friendly.</p>

<h1 id="guidelines-for-cross-compilation">Guidelines for cross-compilation</h1>

<p>Before you make a project cross compilation friendly, think <em>if</em> the project needs to work on a machine (host) that is not the machine it which it was built for (build).</p>

<p>For example, the <a href="https://github.com/EmbedJournal/glem">GLCD Emulator (GLEM)</a> that I created is almost always meant to be operated on the build machine as it is a tool that helps creating embedded GUI during development phase. On the other hand, for a project like <a href="https://github.com/EmbedJournal/limpid">limpid</a>, I knew cross-compilation has to be a design goal as the library is expected to be used for communication/integration with embedded applications.</p>

<h2 id="allow-make-variables-to-be-overridden">Allow make variables to be overridden</h2>

<p>In makefiles, use the conditional assignment operator <code class="language-plaintext highlighter-rouge">?=</code> (assign only if not set) as apposed to regular assignments such as <code class="language-plaintext highlighter-rouge">=</code> and <code class="language-plaintext highlighter-rouge">:=</code> wherever necessary. This give the users the ability to override some of your variables from command line like so, <code class="language-plaintext highlighter-rouge">CC=arm-linux-gcc make all</code>.</p>

<h2 id="dont-hard-code-anything">Don’t hard code anything</h2>

<p>This is true for paths, compiler names, tool names, etc., If you need to access some tool, conditionally assign it to a variable and then use that instead.</p>

<p>Some people feel the need to hard code the PWD in their make recipes as they did not <a href="https://www.gnu.org/software/make/manual/html_node/Flavors.html#Flavors">understand the difference between <code class="language-plaintext highlighter-rouge">=</code> and <code class="language-plaintext highlighter-rouge">:=</code></a> and getting the PWD seemed impossible at that time. As it turn out, this is rookie mistake and turns off people. Just take the longer route and read and understand the difference.</p>

<h2 id="verbosely-list-all-dependencies">Verbosely list all dependencies</h2>

<p>Listing all external dependencies of a project is a good starting point for cross compilation. This gives your users an estimate of the effort needed to your code compiled to their host. It also reduces the number of emails you get asking for clarifications.</p>

<h2 id="stick-to-the-generic-stuffs">Stick to the generic stuffs</h2>

<p>This is more of a note on portability. If you plan on having a wider coverage for your project, you should stick to things that are generic read about <a href="https://en.wikipedia.org/wiki/POSIX">POSIX</a>.</p>

<p>For instance, if you want your project to be able to run on a windows platform (sinful as it can be), you might want to stay aways from stuffs like Unix domain sockets.</p>

<h2 id="dont-over-engineer">Don’t over engineer</h2>

<p>One of the common mistakes that people do when staring off a project is to start big, use your sense of proportion.</p>

<p>Don’t employ auto tools for a small project (sub 50k lines of code) it just adds too much clutter to your working directory. Don’t adopt a multi-makefile chaining solution for sub 10k lines of code project, a single makefile would do perfectly fine.</p>

<h2 id="provide-for-more-than-one-way-to-skin-the-cat">Provide for more than one way to skin the cat</h2>

<p>People like to have more than one way to get a project cross compiled. This can be due to a variety of reasons, it may be just be that they have a personal preference (I do). Or they may already have a build system in place that provides some interface for cross compilation and would like to integrate with minimum to no code change.</p>

<p>This may not always come in handy given the number of ways there exists, but its certainly better than having only one.</p>

<h2 id="documentation">Documentation</h2>

<p>This is probably this single most important thing to do in your project if you expect others to work/contribute on top of it. A single README file form you on the top level of the repository explaining the working with a preliminary cross-compilation example will be a huge help for anyone attempting to use your project.</p>

<p>Never, ever, skimp of this.</p>

<h1 id="conclusion">Conclusion</h1>

<p>To wrap it all up, I think I’ve covered most of what came to my mind about cross compilation. Like I said earlier, at the end of the day, it all boils down to a bunch of exports followed by a make. But surprisingly enough, a lot of people get stuck here. Hopefully this article helped some people get over their fear/fret for cross compilation. Leave your feedback/suggestions in the comments section below.</p>

<div class="language-text highlighter-rouge"><div class="highlight"><pre class="highlight"><code>Edit History:
30 Aug 2018 - Correct heading levels to match new styles
</code></pre></div></div>]]></content><author><name>Siddharth</name><email>siddharth@embedjournal.com</email></author><category term="embedded" /><category term="XCompile" /><category term="Basics" /><summary type="html"><![CDATA[Cross-compiling is an integral part of embedded software development. Most established projects adhere to set of well defined contract to achieve this. But still, there are many other (smaller) projects which employ subtle variations to achieve the same effect. Owing to this, a lot of beginners get thrown off guard when enlisted to cross-compile modules.]]></summary></entry><entry><title type="html">Installing and configuring a TFTP Server on Ubuntu</title><link href="https://embedjournal.com/installing-configuring-a-tftp-server-ubuntu/" rel="alternate" type="text/html" title="Installing and configuring a TFTP Server on Ubuntu" /><published>2017-11-23T18:26:30+00:00</published><updated>2017-11-23T18:26:30+00:00</updated><id>https://embedjournal.com/installing-and-configuring-a-tftp-server-in-ubuntu</id><content type="html" xml:base="https://embedjournal.com/installing-configuring-a-tftp-server-ubuntu/"><![CDATA[<p>TFTP is a very simple UDP file transfer protocol that can be implemented with very little effort and footprint. For this reason, TFTP servers are very crucial for embedded developers even if they are used only for the purpose of firmware upgrades. This article is more of a note-to-self so I don’t have to hunt for it elsewhere.</p>

<p>We start by installing tftp client and server packages along with xinitd.</p>

<div class="language-shell highlighter-rouge"><div class="highlight"><pre class="highlight"><code><span class="nv">$ </span><span class="nb">sudo </span>apt-get <span class="nb">install </span>xinetd tftpd tftp
</code></pre></div></div>

<p>Create a directory to to act as your TFTP root (the place from which you serve your files) and set permissions so as to allow everyone to read-write-execute from there. Typically, this directory would be called <code class="language-plaintext highlighter-rouge">tftpboot</code> and placed at root level, and we will just stick to that convention.</p>

<div class="language-shell highlighter-rouge"><div class="highlight"><pre class="highlight"><code><span class="nv">$ </span><span class="nb">sudo mkdir</span> /tftpboot
<span class="nv">$ </span><span class="nb">sudo chmod</span> <span class="nt">-R</span> 777 /tftpboot
<span class="nv">$ </span><span class="nb">sudo chown</span> <span class="nt">-R</span> nobody /tftpboot
</code></pre></div></div>

<p>Create a new service in xinitd by creating <code class="language-plaintext highlighter-rouge">/etc/xinetd.d/tftp</code> with the following contents.</p>

<div class="language-text highlighter-rouge"><div class="highlight"><pre class="highlight"><code>service tftp
{
    protocol        = udp
    port            = 69
    socket_type     = dgram
    wait            = yes
    user            = nobody
    server          = /usr/sbin/in.tftpd
    server_args     = /tftpboot
    disable         = no
}
</code></pre></div></div>

<p>Now that everything is in place, restart the xinetd service for the changes to kick-in and start your TFTP server.</p>

<div class="language-shell highlighter-rouge"><div class="highlight"><pre class="highlight"><code><span class="nb">sudo </span>service xinetd restart
</code></pre></div></div>

<p>You can pass an additional <code class="language-plaintext highlighter-rouge">-c</code> option to <code class="language-plaintext highlighter-rouge">server_args</code> to allow remote file creation, but that is generally not preferred.</p>

<p>Now the TFTP server should be up and running. Now let’s test if its working,</p>

<div class="language-shell highlighter-rouge"><div class="highlight"><pre class="highlight"><code><span class="nv">$ </span><span class="nb">echo</span> <span class="s2">"Test TFTP Server"</span> <span class="o">&gt;</span> /tftpboot/test.txt
<span class="nv">$ </span>tftp &lt;server-ip&gt;
tftp&gt; get test.txt
tftp&gt; quit
</code></pre></div></div>

<p>After performing the above steps, you should have a file named <code class="language-plaintext highlighter-rouge">test.txt</code> in your current directory with the contents “Test TFTP Server”. If you did, your server is configured correctly.</p>]]></content><author><name>Siddharth</name><email>siddharth@embedjournal.com</email></author><category term="linux" /><category term="Tools" /><category term="Basics" /><summary type="html"><![CDATA[TFTP is a very simple UDP file transfer protocol that can be implemented with very little effort and footprint. For this reason, TFTP servers are very crucial for embedded developers even if they are used only for the purpose of firmware upgrades. This article is more of a note-to-self so I don’t have to hunt for it elsewhere.]]></summary></entry><entry><title type="html">Memory Leak - Analysis and Detection Strategies</title><link href="https://embedjournal.com/memory-leak-analysis-detection-strategies/" rel="alternate" type="text/html" title="Memory Leak - Analysis and Detection Strategies" /><published>2017-07-09T14:25:54+00:00</published><updated>2017-07-09T14:25:54+00:00</updated><id>https://embedjournal.com/memory-leak-analysis-and-detection-strategies</id><content type="html" xml:base="https://embedjournal.com/memory-leak-analysis-detection-strategies/"><![CDATA[<p>The first thing that comes to mind when we talk about dynamic memory and leaks is Valgrind. You may also be familiar with static analysis tools, such as Coverity. It could be DevPartner or Boundschecker or many such tools that I won’t dare attempt to list here.</p>

<p>But what if such tools are <em>NOT</em> an option?</p>

<div id="section-nav">
  <h3>Table of Contents</h3>
<ul id="markdown-toc">
  <li><a href="#broad-categories-of-memory-leaks" id="markdown-toc-broad-categories-of-memory-leaks">Broad Categories of Memory Leaks</a>    <ul>
      <li><a href="#early-returns" id="markdown-toc-early-returns">Early returns</a></li>
      <li><a href="#strdup-pointer-mix-up" id="markdown-toc-strdup-pointer-mix-up">Strdup pointer mix-up</a></li>
      <li><a href="#nesting-allocated-pointers" id="markdown-toc-nesting-allocated-pointers">Nesting allocated pointers</a></li>
      <li><a href="#pointer-arithmetic-loss" id="markdown-toc-pointer-arithmetic-loss">Pointer arithmetic loss</a></li>
      <li><a href="#abandoned-list-node" id="markdown-toc-abandoned-list-node">Abandoned list node</a></li>
    </ul>
  </li>
  <li><a href="#strategies-for-locatingfixing-memory-leaks" id="markdown-toc-strategies-for-locatingfixing-memory-leaks">Strategies for locating/fixing memory leaks</a>    <ul>
      <li><a href="#least-testedadded-code-first" id="markdown-toc-least-testedadded-code-first">Least tested/added code first</a></li>
      <li><a href="#watch-out-for-log-flooding" id="markdown-toc-watch-out-for-log-flooding">Watch out for log flooding</a></li>
      <li><a href="#accelerate-activity-for-early-reproduction" id="markdown-toc-accelerate-activity-for-early-reproduction">Accelerate activity for early reproduction</a></li>
      <li><a href="#selective-patching" id="markdown-toc-selective-patching">Selective patching</a></li>
      <li><a href="#kill-suspected-process" id="markdown-toc-kill-suspected-process">Kill suspected process</a></li>
    </ul>
  </li>
  <li><a href="#doing-it-the-hard-way" id="markdown-toc-doing-it-the-hard-way">Doing it the hard way</a>    <ul>
      <li><a href="#lay-down-the-ground-rules-for-the-tool" id="markdown-toc-lay-down-the-ground-rules-for-the-tool">Lay down the ground rules for the tool:</a></li>
    </ul>
  </li>
</ul>

</div>

<p>This is not as remote as it appears at first glance. Coverity is not open source, ergo not at your disposal when you really need it. Valgrind may not have been ported on to your target platform or there may not be enough space—in a near production product—left to add a beast like Valgrind.</p>

<p>For all you know, it could just be that your delivery time lines are too rigid to accommodate the time taken to setup the necessary test bed to do a full scale memory analysis. This is particularly likely in memory leaks; they have a nasty habit of surfacing during the last minute when longevity test are conducted.</p>

<p>Nonetheless, it helps to understand what makes a leak, a leak. Even if you are using a tool, you need to understand how to discern the meaning of the logs they spit out (you are right, they don’t scream: there’s your leak go fix it!) and spot a leak, in an endless list of false positives.</p>

<h2 id="broad-categories-of-memory-leaks">Broad Categories of Memory Leaks</h2>

<p>For most practical situations, you will be facing a deterministic, reproducible leak in one or more processes resulting in inflation of total used memory and eventually system failure due to starvation. We will get to that in a bit. But for now, let’s take a look at the board categories of the memory leak bugs.</p>

<p>Obviously, there are a lot of other remote places where a memory leak can happen too. The goal here is to be aware of most commonly occurring patterns (low hanging fruits) for a rainy day.</p>

<h3 id="early-returns">Early returns</h3>

<p>This is perhaps the single most common type of leak that I have come across. The cause is pretty simple, code changes that introduce a return statement made by ignorant maintenance programmers. Generally, the software written by a programmer with full context in mind (usually the initial developer) doesn’t suffer such problems.</p>

<p>This can be better explained with an example.  Let’s assume method <code class="language-plaintext highlighter-rouge">print_model_name</code> gets a cars model name (dynamically allocated pointer for some odd reason!) and prints it.</p>

<div class="language-c highlighter-rouge"><div class="highlight"><pre class="highlight"><code><span class="kt">int</span> <span class="nf">get_print_model_name</span><span class="p">(</span><span class="n">car_t</span> <span class="o">*</span><span class="n">car</span><span class="p">)</span>
<span class="p">{</span>
    <span class="kt">char</span> <span class="o">*</span><span class="n">model</span> <span class="o">=</span> <span class="n">malloc</span><span class="p">(</span><span class="k">sizeof</span><span class="p">(</span><span class="n">CAR_MODEL_STR</span><span class="p">));</span>
    <span class="k">if</span> <span class="p">(</span><span class="n">model</span> <span class="o">==</span> <span class="n">null</span><span class="p">)</span>
        <span class="k">return</span> <span class="o">-</span><span class="mi">1</span><span class="p">;</span>

    <span class="n">get_car_model_name</span><span class="p">(</span><span class="n">car</span><span class="o">-&gt;</span><span class="n">model_id</span><span class="p">,</span> <span class="n">car</span><span class="o">-&gt;</span><span class="n">year</span><span class="p">,</span> <span class="o">&amp;</span><span class="n">model</span><span class="p">);</span>
    <span class="n">printf</span><span class="p">(</span><span class="s">"Model: %s</span><span class="se">\n</span><span class="s">"</span><span class="p">,</span> <span class="n">model</span><span class="p">);</span>
    <span class="n">free</span><span class="p">(</span><span class="n">model</span><span class="p">);</span>
    <span class="k">return</span> <span class="mi">0</span><span class="p">;</span>
<span class="p">}</span>
</code></pre></div></div>

<p>So far so good. Later, a maintenance programmer drops by and find that <code class="language-plaintext highlighter-rouge">get_car_model_name</code> returns error for cars that were manufactured before 1999 (not relevant, but maybe they didn’t have a model number back them). He goes ahead and makes the changes necessary to handle this case. After the change, the code looked like this:</p>

<div class="language-c highlighter-rouge"><div class="highlight"><pre class="highlight"><code><span class="kt">int</span> <span class="nf">get_print_model_name</span><span class="p">(</span><span class="n">car_t</span> <span class="o">*</span><span class="n">car</span><span class="p">)</span>
<span class="p">{</span>
    <span class="kt">char</span> <span class="o">*</span><span class="n">model</span> <span class="o">=</span> <span class="n">malloc</span><span class="p">(</span><span class="k">sizeof</span><span class="p">(</span><span class="n">CAR_MODEL_STR</span><span class="p">));</span>
    <span class="k">if</span> <span class="p">(</span><span class="n">model</span> <span class="o">==</span> <span class="n">null</span><span class="p">)</span>
        <span class="k">return</span> <span class="o">-</span><span class="mi">1</span><span class="p">;</span>

    <span class="c1">// get_car_model_name returns non-zero on errors.</span>
    <span class="c1">// propagate the error to caller.</span>
    <span class="k">if</span> <span class="p">(</span><span class="n">get_car_model_name</span><span class="p">(</span><span class="n">car</span><span class="o">-&gt;</span><span class="n">model_id</span><span class="p">,</span> <span class="n">car</span><span class="o">-&gt;</span><span class="n">year</span><span class="p">,</span> <span class="o">&amp;</span><span class="n">model</span><span class="p">)</span> <span class="o">!=</span> <span class="mi">0</span><span class="p">)</span>
        <span class="k">return</span> <span class="o">-</span><span class="mi">1</span><span class="p">;</span>

    <span class="n">printf</span><span class="p">(</span><span class="s">"Model: %s</span><span class="se">\n</span><span class="s">"</span><span class="p">,</span> <span class="n">model</span><span class="p">);</span>
    <span class="n">free</span><span class="p">(</span><span class="n">model</span><span class="p">);</span>
    <span class="k">return</span> <span class="mi">0</span><span class="p">;</span>
<span class="p">}</span>
</code></pre></div></div>

<p>As you must have noticed, the return that he added now, does not free the allocated pointer <code class="language-plaintext highlighter-rouge">model</code>.</p>

<p>This is a classical example of an early return causing a leak. In this example it may look seemingly obvious, as there are only a couple of lines in the entire method. Things may not look as obvious when functions are a 100 lines long.</p>

<p>Now, is the time you recollect those programming best practices class where you were instructed to break down your functions into smaller blocks so they fit one widow width?</p>

<p>A good practice is to stick to 30 or 40 lines as the upper limit for your methods.</p>

<h3 id="strdup-pointer-mix-up">Strdup pointer mix-up</h3>

<p>strdup is a method that is used to duplicate a given string on to an allocated pointer. strdup will allocated a pointer sufficiently large to accommodate the string and the tailing null character. This comes in handy at times; (though I have no liking for this method) Very painful at times too.</p>

<p>Normally, we tend to subconsciously name the duped pointer with a similar name as that of the original pointer. Some prefer adding the suffix <code class="language-plaintext highlighter-rouge">_dup</code> or just a number to indicated its the same string. What ever the case, they end up calling free on the original pointer instead of the duped one.</p>

<div class="language-c highlighter-rouge"><div class="highlight"><pre class="highlight"><code><span class="kt">void</span> <span class="nf">print_string</span><span class="p">(</span><span class="k">const</span> <span class="kt">char</span> <span class="o">*</span><span class="n">p</span><span class="p">)</span>
<span class="p">{</span>
    <span class="kt">char</span> <span class="o">*</span><span class="n">p1</span> <span class="o">=</span> <span class="n">strdup</span><span class="p">(</span><span class="n">p</span><span class="p">);</span>
    <span class="n">print_char_pointer</span><span class="p">(</span><span class="n">p1</span><span class="p">);</span>
    <span class="n">free</span><span class="p">(</span><span class="n">p</span><span class="p">);</span>
<span class="p">}</span>
</code></pre></div></div>
<p>The sad truth of the matter is, GCC doesn’t catch this sort of errors (even with <code class="language-plaintext highlighter-rouge">-Wall</code> and <code class="language-plaintext highlighter-rouge">-Wextra</code>).</p>

<h3 id="nesting-allocated-pointers">Nesting allocated pointers</h3>

<p>With complex problem statements, we are forced to use complex data structures. Often times, we allocate memory for a structure and then allocated memory for some members within the structure. For example,</p>

<div class="language-c highlighter-rouge"><div class="highlight"><pre class="highlight"><code><span class="k">struct</span> <span class="n">sensor_data</span> <span class="p">{</span>
    <span class="kt">int</span> <span class="n">sendor_id</span><span class="p">;</span>
    <span class="kt">char</span> <span class="o">*</span><span class="n">sensor_name</span><span class="p">;</span>
    <span class="kt">float</span> <span class="n">data</span><span class="p">;</span>
<span class="p">}</span>

<span class="k">struct</span> <span class="n">sensor_data</span> <span class="o">*</span><span class="nf">get_my_sensor_data</span><span class="p">()</span>
<span class="p">{</span>
    <span class="k">struct</span> <span class="n">sensor_data</span> <span class="o">*</span><span class="n">d</span> <span class="o">=</span> <span class="n">malloc</span><span class="p">(</span><span class="k">sizeof</span><span class="p">(</span><span class="k">struct</span> <span class="n">sensor_data</span><span class="p">));</span>
    <span class="k">if</span> <span class="p">(</span><span class="n">d</span> <span class="o">==</span> <span class="n">null</span><span class="p">)</span>
        <span class="k">return</span> <span class="nb">NULL</span><span class="p">;</span>

    <span class="n">d</span><span class="o">-&gt;</span><span class="n">sensor_id</span> <span class="o">=</span> <span class="n">MY_COOL_SESOR_ID</span><span class="p">;</span>
    <span class="n">d</span><span class="o">-&gt;</span><span class="n">sensor_name</span> <span class="o">=</span> <span class="n">strdup</span><span class="p">(</span><span class="n">SENSOR_NAME_STRING</span><span class="p">);</span>
    <span class="n">d</span><span class="o">-&gt;</span><span class="n">data</span> <span class="o">=</span> <span class="n">get_sensor_data</span><span class="p">();</span>

    <span class="k">return</span> <span class="n">d</span><span class="p">;</span>
<span class="p">}</span>
</code></pre></div></div>

<p>Here the returned pointer to <code class="language-plaintext highlighter-rouge">struct sensor_data</code> has two allocated pointers instead of one. The caller will have to free <code class="language-plaintext highlighter-rouge">d-&gt;sensor_name</code> first and then free pointer to <code class="language-plaintext highlighter-rouge">struct sensor_data</code>.</p>

<p>The way this is done is create a dedicated destructor method to free all such child allocations and then free the parent itself.</p>

<div class="language-c highlighter-rouge"><div class="highlight"><pre class="highlight"><code><span class="kt">void</span> <span class="nf">destroy_sensor_data</span><span class="p">(</span><span class="k">struct</span> <span class="n">sensor_data</span> <span class="o">*</span><span class="n">d</span><span class="p">)</span>
<span class="p">{</span>
    <span class="n">free</span><span class="p">(</span><span class="n">d</span><span class="o">-&gt;</span><span class="n">sensor_name</span><span class="p">);</span>
    <span class="n">free</span><span class="p">(</span><span class="n">d</span><span class="p">);</span>
<span class="p">}</span>
</code></pre></div></div>

<p>At a lot of places where they don’t have such helper methods to release allocated memory, not all these child allocations are not freed before the parent is free-ed. The destructor method nicely scales as you add more pointers into the structure that needs to be free-ed.</p>

<h3 id="pointer-arithmetic-loss">Pointer arithmetic loss</h3>

<p>Pointer arithmetics is so popular that, pointer without arithmetic operations on them is just unthinkable (unusable). It is also a popular way to loose an allocated pointer without a trace.</p>

<p>You allocate a pointer to a series of integers. Then, by force of habit, inside loops you increment the pointer dereferencing it at each iteration to store a value that that offset. The end result, you have an array of non-free-able integers.</p>

<div class="language-c highlighter-rouge"><div class="highlight"><pre class="highlight"><code><span class="kt">int</span> <span class="o">*</span><span class="nf">get_numbers</span><span class="p">(</span><span class="kt">int</span> <span class="n">till</span><span class="p">)</span>
<span class="p">{</span>
    <span class="kt">int</span> <span class="n">i</span><span class="p">;</span>
    <span class="kt">int</span> <span class="o">*</span><span class="n">p</span> <span class="o">=</span> <span class="n">malloc</span><span class="p">(</span><span class="k">sizeof</span><span class="p">(</span><span class="kt">int</span><span class="p">)</span> <span class="o">*</span> <span class="n">till</span><span class="p">);</span>
    <span class="k">for</span> <span class="p">(</span><span class="n">i</span><span class="o">=</span><span class="mi">1</span><span class="p">;</span> <span class="n">i</span><span class="o">&lt;=</span><span class="n">till</span><span class="p">;</span> <span class="n">i</span><span class="o">++</span><span class="p">)</span> <span class="p">{</span>
        <span class="o">*</span><span class="p">(</span><span class="n">p</span><span class="o">++</span><span class="p">)</span> <span class="o">=</span> <span class="n">i</span><span class="p">;</span>
    <span class="p">}</span>
    <span class="k">return</span> <span class="n">p</span><span class="p">;</span>
<span class="p">}</span>
</code></pre></div></div>

<p>Notice that the pointer that the caller will get will be pointing to the end of the allocated memory chunk in instead of the beginning. A free on p at this point will have no effect what-so-ever.</p>

<h3 id="abandoned-list-node">Abandoned list node</h3>

<p>Lists (single or double) are a very common data structure. Often times, each node in the list dynamically allocated on demand. The problem is that, the nodes have to be removed from the list and then destroyed (remember nesting allocated pointers). Sometimes, we remove an item from the list and just forget to properly clean it up.</p>

<p>Again, this is a classic place where a destructor method for each node make a lot of sense.</p>

<h2 id="strategies-for-locatingfixing-memory-leaks">Strategies for locating/fixing memory leaks</h2>

<p>There are several strategies that you can employ to effectively locate and fix memory leaks. Some of them are common sense, while some come with work experience. I have listed down whatever I remember from my time fixing such issues. This is more of a reminder for myself when I have to get back to such issues.</p>

<h3 id="least-testedadded-code-first">Least tested/added code first</h3>

<p>If your project is of a reasonable size, you will have a bunch of third-party/FOSS packages included in source tree. Generally (convention), stable releases of these software packages are ported into your applications. This is a good thing because it’s an audited code surface and you can bank on the fact that those packages have already gone through rigorous testing before their releases.</p>

<p>Now that you have ruled out those packages (be sure to git annotate those files to see if any other changes have been added on top of the downloaded packages), you are probably left with code that was developed in-house and those that has a lot of changes made in-house. You can be almost sure that majority of your leak is happening in this area.</p>

<h3 id="watch-out-for-log-flooding">Watch out for log flooding</h3>

<p>This has been said over and over again. Most of the time, a log file that your application wrote to a RAMFS directory will let you go on a wild goose chase (in this case a leak, of course) for hours, if not days. A general  good practice is to disable logging while looking for a leak in the system.</p>

<p>Also note that, deleting a file from RAMFS does not guarantee that the kernel will recollect that memory. That is, even if you delete the flooded log file, the total used memory doesn’t come back down. But don’t let that fool you into look elsewhere.</p>

<h3 id="accelerate-activity-for-early-reproduction">Accelerate activity for early reproduction</h3>

<p>Initially, I mentioned that the leak has to be deterministic and reproducible. The idea is that, you should be able to perform a measured number of steps to reproduce the leak. In some cases, the leak happens even if you don’t do anything, and leave the device powered on for sometime. But that is not true, the device is doing a lot of things even when it is sting around doing nothing.</p>

<p>Now comes the deterministic part, for a set of actions, over a given period, the leak has to be deterministic. If this is the case, you are very close to finding and fixing it. Now that we know so much about it’s behavior, we can try to narrow down which subset of the action or actions are contributing more to the leak.</p>

<p>Let’s say you have a HTTP server that you suspect is leaking memory. You start by performing a lot of GET/POST requests on the server to see with code code path is causing/contributing to the leak. This will give you some hints on how to focus your search for the leak.</p>

<h3 id="selective-patching">Selective patching</h3>

<p>Although I mentioned that you can rely on testing done on external packages, that’s only for initial elimination to reduce the number of balls you have to juggle. You still cannot entirely rule out the possibility that there could be a leak in such packages as well.</p>

<p>This where you go into release notes of each packages and look for any hints on memory leak fixes in later releases. If there is one, you just got lucky. Sometimes it may not be possible to upgrade the entire package to later version. In such case you will have to selectively patch changes that correspond to the leak alone and see if that helps.</p>

<p>If employed correctly, this can turn out to be a life saver. It is a common practice to issue patches for critical fixes to older versions too. You could contact the package maintainers and ask them if they have a patch rolled out for your version.</p>

<h3 id="kill-suspected-process">Kill suspected process</h3>

<p>This when you know that the total system memory is going up but you haven’t determined with process/processes are leaking memory. Typically you resort to doing <code class="language-plaintext highlighter-rouge">free</code> or <code class="language-plaintext highlighter-rouge">top</code> or even <code class="language-plaintext highlighter-rouge">cat /proc/meminfo</code> to over an extended range of time and then look at these logs to see if any process has steadily increased in memory consumption.</p>

<p>Once you have narrowed down a list of possible suspected processes, you can restart these process one at a time to see of the total available memory has increased. This method can also be effectly employed to see if the leak caused by a given process if significant enough and thereby re-prioritizing your goals.</p>

<h2 id="doing-it-the-hard-way">Doing it the hard way</h2>

<p>Armed with all these information, let’s see what it takes to create a tool to profile and log sufficient information so we can do some smartness over the dumped data to locate and fix memory leaks.</p>

<h3 id="lay-down-the-ground-rules-for-the-tool">Lay down the ground rules for the tool:</h3>

<ul>
  <li>Solution should not take more than 5 to 10 minutes to setup.</li>
  <li>Should try to cover most common types of leaks (low hanging fruits discussed here).</li>
  <li>Must do some bounds check while we are at it.</li>
  <li>Should catch free errors (free on unallocated pointers).</li>
</ul>

<p>With all these in mind, I wrote a simple but effective <a href="https://github.com/EmbedJournal/dmprof">memory profiler</a> that helped me sort of lot of memory leaks. I know there are a dozen such tools that try to address the exact same thing. For sub-1000 lines of programs, (IMHO, of course) it it is far easier to write it yourself then to look and understand someone’s code. It takes almost the same time, and gives far better control over the software.</p>

<p>Hope that was helpful. Did I miss something? leave you comments below. I will gladly take your inputs into this post.</p>]]></content><author><name>Siddharth</name><email>siddharth@embedjournal.com</email></author><category term="Programming" /><category term="Theory" /><category term="Ideas" /><summary type="html"><![CDATA[The first thing that comes to mind when we talk about dynamic memory and leaks is Valgrind. You may also be familiar with static analysis tools, such as Coverity. It could be DevPartner or Boundschecker or many such tools that I won’t dare attempt to list here.]]></summary></entry><entry><title type="html">Use screen to keep SSH sessions alive between connections</title><link href="https://embedjournal.com/screen-keep-ssh-sessions-alive-between-connections/" rel="alternate" type="text/html" title="Use screen to keep SSH sessions alive between connections" /><published>2017-06-18T05:44:53+00:00</published><updated>2017-06-18T05:44:53+00:00</updated><id>https://embedjournal.com/screen-keep-ssh-sessions-alive-between-connections</id><content type="html" xml:base="https://embedjournal.com/screen-keep-ssh-sessions-alive-between-connections/"><![CDATA[<p>For those of you who haven’t heard about <a href="https://www.gnu.org/software/screen/">GNU Screen</a>, it is a window manager that multiplexes a physical terminal between several processes, typically interactive shells. It allows you to start, retain, attach and detach to a session across different connections.</p>

<p>In lay man’s terms, it’s a life saver when you have to work on remote devices over flaky networks. It is a simple tool that does one thing and does it extremely very well.</p>

<p>So far the only annoyance I have had with screen is its behavior when home directory encryption is enabled. But this is not all that big a deal breaker, as most people don’t turn on home directory encryption (except may be accidentally, or when they need to share the machine with some other users), they encrypt the whole drive.</p>

<p>I spend a lot of my time on remote machines. Be it my development server, or the deployment environment all of it is done through a SSH connection to the remote host. At times, these remote hosts are across the globe on another continent. This is really where it gets super annoying, as you have to type something expect it to be there in the next 2 seconds and typos are an expensive mistake.</p>

<h3 id="what-are-we-trying-to-solve">What are we trying to solve?</h3>

<p>To give you an idea of what I am taking about, let’s say you have a development server, where you initiate a build. A clean build on my current project (when I last timed) takes little over 40 minutes and incremental builds take up to 2 minutes (for this, I believe the poor make rules are fault).</p>

<p>Now, lets say you start a SSH connection and initiate a clean build. For the sake of this discussion we will assume that you don’t know how to keep an SSH connection alive indefinitely and your connection is interrupted. Or you were moving your laptop around and your wireless card roamed away to another SSID and you lost connection.</p>

<p>You will notice that the make process that you initiated receives a hang-up signal and dies with your connection.</p>

<p>One obvious and not so great way to deal with this is to start is with <code class="language-plaintext highlighter-rouge">nohup</code> and push it to background with a <code class="language-plaintext highlighter-rouge">&amp;</code> like this.</p>

<div class="language-shell highlighter-rouge"><div class="highlight"><pre class="highlight"><code><span class="nv">$ </span><span class="nb">nohup </span>make &amp;
</code></pre></div></div>

<p>This does work, in the sense that it will discard the hangup signal and persist even after the connection has ended. But it doesn’t actually help if you were editing some file or if you needed more than just one TTY. This is where screen comes into picture and far exceeds expectations.</p>

<h2 id="gnu-screen">GNU Screen</h2>

<div class="text-center">
    <a class="b-captionImg" href="#" data-featherlight="/assets/posts/linux/2017-06-18-screen-keep-ssh-sessions-alive-between-connections/screen_session.png">
        <img data-src="/assets/posts/linux/2017-06-18-screen-keep-ssh-sessions-alive-between-connections/screen_session.png" class="img-responsive lazyload" alt="gnu screen window grab" />
        
    </a>
</div>

<p>Your work flow will be like this, login to remote machine and then start off a screen session and then start doing your works in that session. If your connection gets interrupted, you don’t have to give a damn about it. Screen is still running in that machine. You can always ssh back to that machine and then reconnect that session to pickoff from where you left.</p>

<h3 id="screen-basics">Screen Basics</h3>

<p>The good thing about screen is, you just need to know a handful of things initially to get going. Once you’ve gotten a hang of these basic stuffs, you can always pick up more things as and when you need them. So let’s dive in.</p>

<p>Screen is not installed by default in most distributions, so you must use <code class="language-plaintext highlighter-rouge">apt</code> or <code class="language-plaintext highlighter-rouge">yum</code> or <code class="language-plaintext highlighter-rouge">brew</code> to install it.</p>

<p>Not surprisingly, you start a screen session by using the <code class="language-plaintext highlighter-rouge">screen</code> command on a shell.</p>

<div class="language-shell highlighter-rouge"><div class="highlight"><pre class="highlight"><code><span class="nv">$ </span>screen
</code></pre></div></div>

<h3 id="screen-key-bindings">Screen key bindings</h3>

<p>Once you hit screen, you are inside a screen session. The key binding prefix for screen is <kbd>Ctrl</kbd> + <kbd>a</kbd>. Any character followed by this sequence is interpreted as a command to screen.</p>

<p>For example, to detach from the session, you will have to press <kbd>Ctrl</kbd> + <kbd>a</kbd>, and then press <kbd>d</kbd>. The screen documents refer to this sequence with <code class="language-plaintext highlighter-rouge">C-a d</code>. This is of the form, <code class="language-plaintext highlighter-rouge">C-a &lt;command-character&gt;</code></p>

<h3 id="list-attach-and-detach-screen-sessions">List, attach and detach screen sessions</h3>

<p>You can You can use <code class="language-plaintext highlighter-rouge">screen -ls</code> to see the screen sessions that are active. Since we have started only one session so far, your output will list only one session. The following is an example of a screen listing.</p>

<div class="language-text highlighter-rouge"><div class="highlight"><pre class="highlight"><code>There is a screen on:
    13866.pts-7.extrops (Sunday 11 June 2017 04:13:31  IST) (Detached)
1 Socket in /var/run/screen/S-siddharth.
</code></pre></div></div>

<p>Currently there is only one screen running in my computer, so the listing returns only one socket. You can create as many screen sessions as you wish and when you do a <code class="language-plaintext highlighter-rouge">screen -ls</code> you will notice that there are more sockets listed in <code class="language-plaintext highlighter-rouge">/var/run/screen/</code>.</p>

<p>To re attach to the session we earlier detached from, you can do,</p>

<div class="language-shell highlighter-rouge"><div class="highlight"><pre class="highlight"><code><span class="nv">$ </span>screen <span class="nt">-x</span>
</code></pre></div></div>

<p>If there are more than one screen sessions, you will not be able to do <code class="language-plaintext highlighter-rouge">screen -x</code> directly to attach to a session. You have to add the screen’s name to the reattach command to explicitly state which screen you want to attach to. In this case you will have to do a <code class="language-plaintext highlighter-rouge">screen -x 13866</code> to reattach to that session.</p>

<h3 id="screen-window-management">Screen window management</h3>

<p>The best thing about screen is, it’s ability to spawn of more than one TTY. In the same session, you can start off may windows. Screen starts one window when you create a session. After this you can use <code class="language-plaintext highlighter-rouge">C-a c</code> to create another. And move between those windows by using <code class="language-plaintext highlighter-rouge">C-a C-a</code>.</p>

<p>Now you can be in one directory in one and another in the other window. To see the list of windows, you hit <code class="language-plaintext highlighter-rouge">C-a "</code> and move up and down in the list to choose one. Once you are done, you can kill that window with <code class="language-plaintext highlighter-rouge">C-a k</code>, you will be asked for a confirmation to kill the current window. Here is a small subset of key bindings that you need to know to get started with screen.</p>

<table class="table table-bordered">
  <thead>
    <tr>
      <th>Key Binding</th>
      <th>Description</th>
    </tr>
  </thead>
  <tbody>
    <tr>
      <td>C-a c</td>
      <td>create new window</td>
    </tr>
    <tr>
      <td>C-a C-a</td>
      <td>switch between the last windows</td>
    </tr>
    <tr>
      <td>C-a NUM</td>
      <td>change to window by number, NUM</td>
    </tr>
    <tr>
      <td>C-a n</td>
      <td>change to next window in list</td>
    </tr>
    <tr>
      <td>C-a p</td>
      <td>change to previous window in list</td>
    </tr>
    <tr>
      <td>C-a “</td>
      <td>see window list</td>
    </tr>
    <tr>
      <td>C-a k</td>
      <td>kill current window</td>
    </tr>
    <tr>
      <td>C-a \</td>
      <td>kill all windows</td>
    </tr>
    <tr>
      <td>C-a A</td>
      <td>rename current window</td>
    </tr>
  </tbody>
</table>

<p>This is not a full list of key bindings. There is an overwhelming number of <a href="https://www.gnu.org/software/screen/manual/screen.html">key bindings in the screen manual</a> do have a look at it once you have internalised the basics.</p>

<h3 id="customizing-screen-with-screenrc">Customizing screen with screenrc</h3>

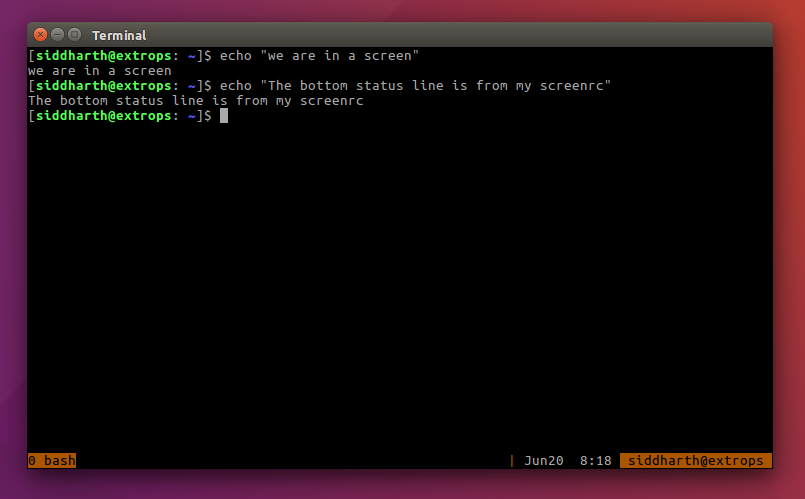
<p>Like vim and bash, the runtime behavior of screen can be customized with a screenrc file in the home directory. The following code block is the contents of my screenrc file, I have been using for years and it works like a charm.</p>

<p>If you are a screen beginner, then this is a good starting point. Copy the following lines to <code class="language-plaintext highlighter-rouge">~/.screenrc</code> and checkout its effects.</p>

<div class="language-text highlighter-rouge"><div class="highlight"><pre class="highlight"><code>startup_message off
term screen-256color
setenv LC_CTYPE en_US.UTF-8
defutf8 on
setenv DISPLAY ':0'
nonblock on
vbell on
msgwait 3
defscrollback 10000
altscreen on

bind = resize =
bind + resize +1
bind - resize -1
bind _ resize max
bind x remove

hardstatus on
sorendition kw
hardstatus alwayslastline
hardstatus string "%{= ky}%-Lw%{=r}%20&gt;%n %t%{= ky}%+Lw %{= ky}%-=| %{= kw}%M%d %c%{-} %{=r} ${USER}@%H "
</code></pre></div></div>

<h3 id="what-to-start-screen-soon-after-login">What to start screen soon after login?</h3>

<p>As you familiarize yourself with screen, you will notice that most of the time <code class="language-plaintext highlighter-rouge">screen</code> is the first command that you run after ssh-ing into the machine. The easiest way to achieve this is to add an <code class="language-plaintext highlighter-rouge">exec screen -d -RR</code> as the last line in  <code class="language-plaintext highlighter-rouge">~/.bashrc</code>.  That works, but if there is some issue with screen and for some reason it won’t start, then adding this line prevents you from logging into your machine, causing a lot of trouble.</p>

<p>Alternatively, you could add the machine details to your <code class="language-plaintext highlighter-rouge">~/.ssh/config</code> and add a <code class="language-plaintext highlighter-rouge">RemoteCommand</code> section to indicate that you would like to attach-to/create a screen session after login.</p>

<div class="language-text highlighter-rouge"><div class="highlight"><pre class="highlight"><code>host my_machine
	HostName 10.10.10.1
	User sid
	RequestTTY yes
	RemoteCommand screen -d -RR
</code></pre></div></div>

<p>Now you could just do <code class="language-plaintext highlighter-rouge">ssh my_machine</code> to login to <code class="language-plaintext highlighter-rouge">sid@10.10.10.1</code>. Neat right?</p>

<h3 id="a-word-on-tmux">A word on tmux</h3>

<p>There is one other tool—tmux—which is gaining popularity lately. I have tried using it and felt like a fish out of the pond, but I’m sure that was highly opinionated.</p>

<p>IMHO, tmux is trying to reinvent the wheel. Why spend all the developer effort in recreating screen when such energy can be channeled to perfect it? All they have managed to achieve is to cause fragmentation in community and user base. That said, I think screen is an amazing tool, being a screen user, I still can’t think of one good reason to switch.</p>]]></content><author><name>Siddharth</name><email>siddharth@embedjournal.com</email></author><category term="Linux" /><category term="Intro" /><category term="Tools" /><summary type="html"><![CDATA[For those of you who haven’t heard about GNU Screen, it is a window manager that multiplexes a physical terminal between several processes, typically interactive shells. It allows you to start, retain, attach and detach to a session across different connections.]]></summary></entry><entry><title type="html">IoT RTOS Zephyr on cheap STM32 Minimum Development Board</title><link href="https://embedjournal.com/iot-rtos-zephyr-stm32-minimum-system-development-board/" rel="alternate" type="text/html" title="IoT RTOS Zephyr on cheap STM32 Minimum Development Board" /><published>2017-05-28T05:32:56+00:00</published><updated>2017-05-28T05:32:56+00:00</updated><id>https://embedjournal.com/iot-rtos-zephyr-stm32-minimum-development-board</id><content type="html" xml:base="https://embedjournal.com/iot-rtos-zephyr-stm32-minimum-system-development-board/"><![CDATA[<p>If you have been listening closely, you would have heard the buzz around <a href="https://www.zephyrproject.org/">Zephyr</a> - a Real Time Operating system (RTOS) for embedded systems. The real buzz comes from the fact that this RTOS is being tweaked for IoT platforms in particular.</p>

<p>A lot of action is happening around Zephyr in the past few months and it is going to play a major role in the embedded/IoT space in the forthcoming days. Support for Tensilica’s Xtensa core is also in the progress, this will be a game changer if we can run Zephyr on our favourite ESP32 in the near future.</p>

<p>Let’s take a look at zephyr and how we can use it to create amazing applications.</p>

<h2 id="why-zephyr">Why Zephyr?</h2>

<p>The Linux Foundation, backed by companies like Linaro, Intel, ST, and NXP are spearheading Zephyr development. Zephyr is released under Open Source Apache license, needless to say, MIT and Apache are some of the most desirable licenses for Free and Open Source Software (FOSS) as they don’t pose much regulation. This means you can use it on, pretty much any commercial product without having to worry about licensing related implications.</p>

<p>Zephyr is being developed by the Linux developer community. So the source code organisation is very well done and resembles the Linux kernel source tree in a lot of sense. The make system has been adopted from the Linux kernel, it kind off makes you feel at home.</p>

<p>I have used <a href="http://www.freertos.org/">FreeRTOS</a> in the past, and during my initial days, have had great difficulty in locating where a given module fell ie., it wasn’t very intuitive to begin with. Also, it had the macro soup (#ifdefs literally everywhere) issue that Zephyr doesn’t (currently) suffer.</p>

<p>To follow this article, you will need the following,</p>
<ul>
  <li><a href="https://robu.in/product/stm32f103c8t6-minimum-system-board-microcomputer-stm32-arm-core-board/">STM32 Minimum Development Board</a></li>
  <li><a href="https://robu.in/product/st-link-v2-programmer-for-stm8-and-stm32/">STLink V2</a></li>
  <li><a href="https://robu.in/product/ft232rl-usb-to-ttl-5v-3-3v-download-cable-to-serial-adapter-module-for-arduino/">USB to UART converter</a></li>
</ul>

<h2 id="stm32-minimum-development-board">STM32 Minimum Development Board</h2>

<p>Since Zephyr is a fairly new RTOS, there are very few boards to which it has already been ported to. Most of the boards which already have a port are either not available or outright expensive. In this post I will take up the “STM32 Minimum Development Board” - a cheaper alternative and try to run Zephyr on it.</p>

<p>Well, this is not exactly a development board in the strictest of senses (all it has is an on board LED). This is more of a breakout board with just the bare minimum to get the CPU to boot. Somehow, the term “STM32 Minimum Development Board” seems to have caught on to it and for the sake of consistency with the existing SEO, we will refer to this board in the same way. More details on the board cab be found at <a href="https://docs.zephyrproject.org/latest/boards/arm/stm32_min_dev/doc/index.html">zephyr’s board document page</a>.</p>

<div class="text-center">
    <a class="b-captionImg" href="#" data-featherlight="/assets/posts/embedded/2017-05-28-iot-rtos-zephyr-stm32-minimum-development-board/stm32_min_dev.jpg">
        <img data-src="/assets/posts/embedded/2017-05-28-iot-rtos-zephyr-stm32-minimum-development-board/stm32_min_dev.jpg" class="img-responsive lazyload" alt="minimum system development board" />
        
    </a>
</div>

<p>I have been having my eye on the STM32F103C8T6 series SoC for some time. Reason being, they were inexpensive and had sufficient juice to do some intermediate level stuffs. So I went ahead and bought one of these <a href="https://robu.in/product/stm32f103c8t6-minimum-system-board-microcomputer-stm32-arm-core-board/">minimum system development board</a> from eBay for like $4 including shipment.</p>

<h2 id="stlink-v2">STLink V2</h2>

<div class="text-center">
    <a class="b-captionImg" href="#" data-featherlight="/assets/posts/embedded/2017-05-28-iot-rtos-zephyr-stm32-minimum-development-board/stlink_v2_openocd.jpg">
        <img data-src="/assets/posts/embedded/2017-05-28-iot-rtos-zephyr-stm32-minimum-development-board/stlink_v2_openocd.jpg" class="img-responsive lazyload" alt="stlink v2 debugger" />
        
    </a>
</div>

<p>Although STM32 can be bootloaded without the need for any external hardware, I bought one of this <a href="https://robu.in/product/st-link-v2-programmer-for-stm8-and-stm32/">STLink V2</a> to flash and debug mu code. It was dirt cheap and I know it will come in handy at some point in time.</p>

<h2 id="hardware-setup">Hardware Setup</h2>

<p>My setup as the following, STM32 breakout board connected to STLink and an UART to USB converter connected to the STM32 to get the console out.</p>

<p><strong>STLink Connections:</strong></p>

<table class="table table-bordered width-50">
  <thead>
    <tr>
      <th style="text-align: center">STM32</th>
      <th style="text-align: center">STLink</th>
    </tr>
  </thead>
  <tbody>
    <tr>
      <td style="text-align: center">IO</td>
      <td style="text-align: center">SWIO (2)</td>
    </tr>
    <tr>
      <td style="text-align: center">CLK</td>
      <td style="text-align: center">SWCLK (6)</td>
    </tr>
    <tr>
      <td style="text-align: center">V3</td>
      <td style="text-align: center">3.3V (7/8)</td>
    </tr>
    <tr>
      <td style="text-align: center">G</td>
      <td style="text-align: center">GND (3/4)</td>
    </tr>
  </tbody>
</table>

<p><strong>UART to USB Connections:</strong></p>

<table class="table table-bordered width-50">
  <thead>
    <tr>
      <th style="text-align: center">STM32</th>
      <th style="text-align: center">USB-UART</th>
    </tr>
  </thead>
  <tbody>
    <tr>
      <td style="text-align: center">A9</td>
      <td style="text-align: center">RXD</td>
    </tr>
    <tr>
      <td style="text-align: center">A10</td>
      <td style="text-align: center">TXD</td>
    </tr>
    <tr>
      <td style="text-align: center">G</td>
      <td style="text-align: center">GND</td>
    </tr>
  </tbody>
</table>

<div class="text-center">
    <a class="b-captionImg" href="#" data-featherlight="/assets/posts/embedded/2017-05-28-iot-rtos-zephyr-stm32-minimum-development-board/stm32_stlink_zephyr_setup.jpg">
        <img data-src="/assets/posts/embedded/2017-05-28-iot-rtos-zephyr-stm32-minimum-development-board/stm32_stlink_zephyr_setup.jpg" class="img-responsive lazyload" alt="stm32_stlink_zephyr_setup" />
        
    </a>
</div>

<h2 id="zephyr---board-support-package">Zephyr - Board Support Package</h2>

<p>To my disappointment, Zephyr wouldn’t run on the board out of the box as the SoC wasn’t ported and the board itself didn’t have a port ie., there was no Board Support Package (BSP) for this board as yet.</p>

<p>Then I read through Zephyr’s docs and looked at other supported hardware. After some time, I branched off to start making changes of my own. Within the first 5 or 6 hours of effort, I was able to get a make shift BSP port working with the my board (although I wasn’t able to get the UART to work at that point).</p>

<p>After a bunch of email exchanges with Erwan Gouriou (Zephyr developer), <a href="https://lists.zephyrproject.org/pipermail/zephyr-devel/2017-May/007664.html">here</a> and <a href="https://lists.zephyrproject.org/pipermail/zephyr-devel/2017-May/007678.html">here</a>, I was able to get a fully working BSP for the STM32F103C8T6 breadboard breakout board. I raised a <a href="https://github.com/zephyrproject-rtos/zephyr/pull/272">pull request</a> sometime back and <del>expecting it to be merged sometime soon</del> is now available upstream.</p>

<h2 id="build-and-flash">Build and Flash</h2>

<p>Now before you start building with zephyr, you will need to setup the zephyr toolchain and kernel sources. This is fairly straight forward procedure and Zephyr’s <a href="https://docs.zephyrproject.org/latest/getting_started/installation_linux.html">Development Environment Setup</a> page does an excellent job at it. If you run into any issues, leave a comment and I will try to sort it out.</p>

<p>I am going to assume you choose the defaults when setting up your zephyr SDK and that you would be using west. If you made modification to the paths during setup, be sure to alter the below guide accordingly. That said, lets go ahead and build the embedded equivalent of a hello-world project — blink-an-led.</p>

<p>For our app to build correctly, you need to source <code class="language-plaintext highlighter-rouge">zephyr-env.sh</code> from the root level of the zephyr repository.</p>

<div class="language-bash highlighter-rouge"><div class="highlight"><pre class="highlight"><code><span class="nb">cd</span> ~/zephyrproject/zephyr <span class="o">&amp;&amp;</span> <span class="nb">source </span>zephyr-env.sh
</code></pre></div></div>

<p>If you plan on workring with zephyr frequently, I found that adding an alias to source the zephyr environment file comes in pretty handy.</p>

<div class="language-bash highlighter-rouge"><div class="highlight"><pre class="highlight"><code><span class="nb">echo</span> <span class="s2">"alias get_zephyr='source ~/zephyrproject/zephyr/zephyr-env.sh'"</span> <span class="o">&gt;&gt;</span> ~/.bashrc
</code></pre></div></div>

<p>Zephyr allows your application to be built outside of the kernel and it’s dependencies — shaddow building. It is a good practice to keep your source code out of the upstream repos (to maintain a clean git tree). So let’s copy the blinky samples into your workspace and then build them.</p>

<div class="language-shell highlighter-rouge"><div class="highlight"><pre class="highlight"><code>get_zephyr <span class="c"># (optional) this is to source zephyr-env.sh</span>
<span class="nb">cp</span> <span class="nt">-r</span> <span class="nv">$ZEPHYR_BASE</span>/samples/basic/blinky ~/workspace/
<span class="nb">mkdir</span> ~/workspace/blinky/build <span class="o">&amp;&amp;</span> <span class="nb">cd</span> ~/workspace/blinky/build
cmake <span class="nt">-DBOARD</span><span class="o">=</span>stm32_min_dev_black ..
make
</code></pre></div></div>

<p>If you did everything right, this <code class="language-plaintext highlighter-rouge">make</code> should build without any warnings or errors. This build triggers a recursive <em>make</em> process that walks up the Zephyr source tree and builds all required modules. Since this is a Zephyr primer, we won’t get into the details on how to configure the kernel. This will be tasked in a separate post.</p>

<p>Now, the final step, sending the built binary into the board to see the output. To do this, all you have to do is, invoke the <code class="language-plaintext highlighter-rouge">flash</code> target and the rest of the work is done for you.</p>

<div class="language-shell highlighter-rouge"><div class="highlight"><pre class="highlight"><code>make flash
</code></pre></div></div>

<p>You will notice that Zephyr invokes <a href="http://openocd.org/">open On Chip Debugger (openOCD)</a> to flash the board. You could also invoke the <code class="language-plaintext highlighter-rouge">debug</code> target to setup a GDB session with the board. Again, this is a huge topic and hence merits a separate post.</p>

<p>Once this succeeds, you should see the only LED on the board, blink away to eternity.</p>

<p>If you run into some issues with <code class="language-plaintext highlighter-rouge">make flash</code>, it porbably due to permission issues. Add the following udev rules to fix them.</p>

<div class="language-sh highlighter-rouge"><div class="highlight"><pre class="highlight"><code>wget https://raw.githubusercontent.com/zephyrproject-rtos/openocd/master/contrib/60-openocd.rules
<span class="nb">mv </span>60-openocd.rules /etc/udev/rules.d/
udevadm control <span class="nt">--reload-rules</span>
udevadm trigger
</code></pre></div></div>

<p>Once the rules are loaded, you must add yourself to the group <code class="language-plaintext highlighter-rouge">plugdev</code>. If the group doesn’t already exist, just crate it. After this, you should be able to successfully flash the device. In my next post we will explore some other interesting features of Zephyr that could come in handy.</p>

<div class="language-plaintext highlighter-rouge"><div class="highlight"><pre class="highlight"><code>Edit History:
28 May 2017 - Initial draft
14 Jul 2019 - Update "Build and Flash" section to that in latest upstream.
28 Sep 2019 - Add note on udev rules for make flash.
</code></pre></div></div>]]></content><author><name>Siddharth</name><email>siddharth@embedjournal.com</email></author><category term="Embedded" /><category term="Zephyr" /><category term="RTOS" /><category term="STM32" /><category term="stm32_min_dev" /><category term="XCompile" /><summary type="html"><![CDATA[If you have been listening closely, you would have heard the buzz around Zephyr - a Real Time Operating system (RTOS) for embedded systems. The real buzz comes from the fact that this RTOS is being tweaked for IoT platforms in particular.]]></summary></entry><entry><title type="html">Custom RFS for Beaglebone Black using Busybox</title><link href="https://embedjournal.com/custom-rfs-beaglebone-black/" rel="alternate" type="text/html" title="Custom RFS for Beaglebone Black using Busybox" /><published>2016-11-09T20:44:41+00:00</published><updated>2016-11-09T20:44:41+00:00</updated><id>https://embedjournal.com/custom-rfs-beaglebone-black</id><content type="html" xml:base="https://embedjournal.com/custom-rfs-beaglebone-black/"><![CDATA[<p>Hello folks,</p>

<p>In my previous post on <a href="/kernel-compilation-beaglebone-black/">Linux kernel compilation for Beaglebone black</a>, I had used pre-built RFS for booting the kernel. Also, I mentioned that the RFS could be built from scratch using a utility called Busybox. In this post, we’ll see, how to create a Custom RFS using Busybox and what are all the additional files required to boot the kernel. The RFS which we’re going to create contains only the bare minimum stuff required to boot the kernel, so you can’t expect it to behave like your distribution’s rootfs.</p>

<p>Before getting our hands dirty by working with Busybox, let’s acquire some basic theory to get things organized!</p>

<h2 id="what-is-rfs">What is RFS?</h2>

<p>RFS is the Root File System (/), the place where the kernel acts upon. All the applications will reside inside this root file system. Usually RFS is created and placed in the Flash memory of the device, which could be either your Android phone or your Personal computer. There is also one filesystem called initramfs, which is used in the boot process of the Linux based desktops/servers. But, initramfs is a RAM based filesystem which contains the entire root file system directories often compressed and passed along with the kernel image. Embedded Linux devices don’t necessarily need initramfs for booting.</p>

<p>During the last stage of the Linux legacy booting process, the kernel executes the /sbin/init which in turn looks for the inittab file in /etc directory. It is based upon the SysV init process. But, most of the modern linux distros now switched from SysV init to Systemd, which is more flexible.</p>

<h3 id="how-do-i-create-a-rfs">How do I create a RFS?</h3>

<p>Now, we know that rootfs is mandatory inorder to boot the linux kernel. But how do I create one? Have you tried “ls /” in your linux machine… Yes, there are lot of directories under ‘/’. Usually not all the directories are needed to get your linux system up and running. Only a fair amount of directories are needed by the kernel, but it entirely depends upon the end application your linux system is using. It could be either a server or an Embedded linux system for a dedicated application.</p>

<p>In our case we’ll consider the latter one, because our target platform is Beaglebone black, which is mostly used for an Embedded application. Let’s discuss the list of directories needed and their uses.</p>

<h3 id="mandatory-directories">Mandatory directories:</h3>

<p><strong>/bin</strong> directory contains the commands used by the normal linux user for day to day activities like ls, cp, rm. It also contains the commands needed during boot process like systemd etc…</p>

<p><strong>/sbin</strong> directory contains the binaries used by the super user for system administration. Some of the commands are insmod, lsmod, ipconfig. Normal users can’t use the commands in this directory without administrative privileages.</p>

<p><strong>/etc</strong> directory contains the files needed for system configuration like init scripts, network conf files, bootloader init scripts, application conf files etc…</p>

<p><strong>/dev</strong> directory contains the special files which represent the devices present in the system like char, block and net devices. It also contains the files needed to interact with the device drivers for a particular hardware using generic read/write calls. For all types of devices attached to the target, appropriate device nodes will be created in this directory.</p>

<p><strong>/lib</strong> directory contains the shared libraries used by the applications in the system. Often it contains the glibc/klibc, ld-linux shared libraries. It also contains the loadable kernel modules under /lib/modules which could be inserted into the system dynamically using modprobe/insmod commands. List of modules should be built while building the kernel using ‘make modules’ command. Modules could also be loaded automatically when the devices are attached to the system using some utilities.</p>

<p><strong>/usr</strong> directory contains the userspace programs and data. In older unix implementations, this is the place where the home directories of all users were placed. It contains the necessary data, headers, libraries and also some programs like telnet, git etc…</p>

<h3 id="nice-to-have">Nice to have:</h3>

<p><strong>/proc</strong> directory is based on procfs filesystem. It is a type of virtual file system which contains files based on the processes existing in the system. There is no need to create any files under this directory, all files will be created once you mount the procfs in this directory.</p>

<p><strong>/sys</strong> directory is based on sysfs filesystem. Like procfs, this is also a type of virtual file system based on the Kernel objects and its attributes. It is most widely used to interact with the device drivers like /dev directory. Drivers need to create sysfs entry, then it may contain files to send/receive data from the driver. For instance LED’s in Beaglebone black could be configured using sysfs/class/leds.</p>

<p><strong>/config</strong> directory is based on configfs filesystem. Major use of the configfs is to manage the Kernel objects from userspace. Unlike sysfs, which just acts on the Kernel objects, this one can modify it in runtime.</p>

<p>Alright, we have seen the list of directories needed and their uses. So, are we going to create all these directories and its contents by hand? It would be an over kill, isn’t it?</p>

<p>For this scenario, we’re going to use a utility called Busybox, which will make our life easier.</p>

<h2 id="busybox-cross-compilation">Busybox Cross compilation</h2>

<p>Here is what the busybox creators had to say about it,</p>

<blockquote>
  <p>BusyBox combines tiny versions of many common UNIX utilities into a single small executable. It provides replacements for most of the utilities you usually find in GNU fileutils, shellutils, etc. The utilities in BusyBox generally have fewer options than their full-featured GNU cousins; however, the options that are included provide the expected functionality and behave very much like their GNU counterparts. BusyBox provides a fairly complete environment for any small or embedded system.</p>
</blockquote>

<p>Busybox is focused mainly on Embedded platforms as the size optimization is vastly required. It could be built as the binary requiring shared libraries (default option) or a single static binary requiring no external shared libraries. We are going to use the latter one.</p>

<h3 id="working-with-busybox">Working with Busybox</h3>

<p>Download the Busybox source from <a href="https://busybox.net/downloads/busybox-1.24.1.tar.bz2">here</a>.</p>

<p>Extract the tarball with <code class="language-plaintext highlighter-rouge">tar -xvf busybox-1.24.1.tar.bz2</code>. Then, cross compile the source for ARM platform using the following commands.</p>

<p>Note: This assumes that you have the arm cross compilation toolchain configured in your system. If not please go through my <a href="/kernel-compilation-beaglebone-black/">previous post</a> to see how to get it done.</p>

<div class="language-shell highlighter-rouge"><div class="highlight"><pre class="highlight"><code><span class="nv">$ </span>make <span class="nv">ARCH</span><span class="o">=</span>arm <span class="nv">CROSS_COMPILE</span><span class="o">=</span>arm-linux-gnueabihf- defconfig
<span class="nv">$ </span>make <span class="nv">ARCH</span><span class="o">=</span>arm <span class="nv">CRSOO_COMPILE</span><span class="o">=</span>arm-linux-gnueabihf- menuconfig
</code></pre></div></div>

<p>Select Busybox Settings -&gt; Build Options -&gt; Build Busybox as a static binary (no shared libs). Press y for selecting that option and save it. Then execute the following commands for building.</p>

<div class="language-shell highlighter-rouge"><div class="highlight"><pre class="highlight"><code><span class="nv">$ </span>make <span class="nv">ARCH</span><span class="o">=</span>arm <span class="nv">CROSS_COMPILE</span><span class="o">=</span>arm-linux-gnueabihf- <span class="nv">CONFIG_PREFIX</span><span class="o">=</span>/path/to/RFS <span class="nb">install</span>
</code></pre></div></div>

<p>After the successful completion of the above commands, you can see 3 directories (bin, sbin, usr) and one file (linuxrc) created in your RFS directory. Path to RFS should be like /media/user/rfs which resides in SD card as ext3 file system. Apart from these, we need few more directories mentioned above to boot the kernel. So, move to the RFS location and create the following files and directories.</p>

<p><strong>/dev:</strong></p>

<p>Create /dev and some special files under this directory.</p>

<div class="language-shell highlighter-rouge"><div class="highlight"><pre class="highlight"><code><span class="nv">$ </span><span class="nb">mkdir </span>dev
<span class="nv">$ </span><span class="nb">mknod </span>dev/console c 5 1
<span class="nv">$ </span><span class="nb">mknod </span>dev/null c 1 3
<span class="nv">$ </span><span class="nb">mknod </span>dev/zero c 1 5
</code></pre></div></div>

<ul>
  <li>/dev/console, is the place where the kernel uses for interaction.</li>
  <li>/dev/null behaves like an empty file and is used to suppress the output from commands/programs.</li>
  <li>/dev/zero contains sequence of zeros used to fill up the memory regions.</li>
</ul>

<p><strong>/lib and /usr/lib:</strong></p>

<p>For the static libraries, copy from the ARM cross compiler toolchain path.</p>

<div class="language-shell highlighter-rouge"><div class="highlight"><pre class="highlight"><code><span class="nv">$ </span><span class="nb">mkdir </span>lib usr/lib
<span class="nv">$ </span>rsync <span class="nt">-a</span> /opt/arm-linux-gnueabihf/lib/ ./lib/
<span class="nv">$ </span>rsync <span class="nt">-a</span> /opt/arm-linux-gnueabihf/lib/ ./usr/lib/
</code></pre></div></div>

<p><strong>/proc, /sys, /root:</strong></p>

<p>Create directories for mounting the virtual filesystems (procfs, sysfs) and root directory.</p>

<div class="language-shell highlighter-rouge"><div class="highlight"><pre class="highlight"><code><span class="nv">$ </span><span class="nb">mkdir </span>proc sys root
</code></pre></div></div>

<p><strong>/etc:</strong></p>

<p>Create /etc and then, create additional files inside this directory.</p>

<div class="language-shell highlighter-rouge"><div class="highlight"><pre class="highlight"><code><span class="nv">$ </span><span class="nb">mkdir </span>etc
<span class="nv">$ </span><span class="nb">cat</span> <span class="o">&gt;&gt;</span> etc/inittab
null::sysinit:/bin/mount <span class="nt">-a</span>
null::sysinit:/bin/hostname <span class="nt">-F</span> /etc/hostname
null::respawn:/bin/cttyhack /bin/login root
null::restart:/sbin/reboot
<span class="o">[</span>ctrl-D]
</code></pre></div></div>

<p>Create another file called fstab and populate it. This file will mount the virtual file systems.</p>

<div class="language-shell highlighter-rouge"><div class="highlight"><pre class="highlight"><code><span class="nv">$ </span><span class="nb">cat</span> <span class="o">&gt;&gt;</span> etc/fstab
proc  /proc proc  defaults  0 0
sysfs /sys  sysfs defaults  0 0
<span class="o">[</span>ctrl-D]
</code></pre></div></div>

<p>Also, create files called hostname and passwd.</p>

<div class="language-shell highlighter-rouge"><div class="highlight"><pre class="highlight"><code><span class="nv">$ </span><span class="nb">cat</span> <span class="o">&gt;&gt;</span> etc/hostname
embedjournal
<span class="o">[</span>ctrl-D]

<span class="nv">$ </span><span class="nb">cat</span> <span class="o">&gt;&gt;</span> etc/passwd
root::0:0:root:/root:/bin/sh
<span class="o">[</span>ctrl-D]
</code></pre></div></div>

<p>Busybox init will first look for /etc/init.d/rcS script, if it can’t find that then it will look for /etc/inittab. Inittab file will mount the virtual filesystem using fstab. Also, it will have the command for getting login prompt and shell.</p>

<p>/sbin/init -&gt; /bin/cttyhack -&gt; /bin/login -&gt; /bin/sh.</p>

<p>Here, we don’t use password for login. So, after logging in, set the password by executing ‘passwd’ command.</p>

<p>Note: You may encounter ‘read only filesystem error’. This is due to the kernel parameters which Uboot has passed. You can change it by modifying the <code class="language-plaintext highlighter-rouge">uEnv.txt</code> file as:</p>

<div class="language-shell highlighter-rouge"><div class="highlight"><pre class="highlight"><code><span class="nv">root</span><span class="o">=</span>/dev/mmcblk0p2 rw
</code></pre></div></div>

<p>This will mount the RFS as read/write file system.</p>

<p>That’s it…</p>

<p>Voila! You have successfully created one Custom RFS using Busybox for Beaglebone Black. Just insert the SD card into BBB’s slot and hold the Boot switch (SW2) while powering up. This will boot your linux kernel using Custom built RFS.</p>

<p>As we always say, if you get stuck at any point kindly post your questions in comments in somewhat detailed manner (No need to post the entire log…), we’ll help you out.</p>]]></content><author><name>Mani</name><email>manivannan@embedjournal.com</email></author><category term="Linux" /><category term="Beagle Bone" /><summary type="html"><![CDATA[Hello folks,]]></summary></entry><entry><title type="html">My approach to the Mesh Flare Problem (IIT-B’s Techfest)</title><link href="https://embedjournal.com/iit-techfest-mesh-flare/" rel="alternate" type="text/html" title="My approach to the Mesh Flare Problem (IIT-B’s Techfest)" /><published>2016-09-28T16:26:55+00:00</published><updated>2016-09-28T16:26:55+00:00</updated><id>https://embedjournal.com/iit-techfest-mesh-flare</id><content type="html" xml:base="https://embedjournal.com/iit-techfest-mesh-flare/"><![CDATA[<p>Over the past few days, I received a plethora of emails and messages on how to make a line follower robot. Mostly, the specification being white line on a black surface. Some even mentioned <a href="/shortest-path-line-follower-robot-logic-revealed/">shortest path detection</a>
loops in the track. Now, I do get emails in which people ask me questions about line follower robots. Nope, thats not unusual (actually I get quite a lot).</p>

<p>The unusual thing was majority of them seemed to give out similar track and robot description. Then I asked one of them to send me an image of the track, thats when I got to know about <a href="http://www.techfest.org/competitions">Mesh Flare</a>, an Event in the TechFest-2016 a technical symposium organized by IIT Bombay. (Here is the <a href="/assets/posts/2016-09-28-iit-techfest-mesh-flare/Mesh_Flare_Zonals_IIT_B_ProblemStatement.pdf" target="_blank">full problem statement</a> just incase they pull it down)</p>

<p>After looking at it for sometime, I had to get up and search for my college ID card (so that I too can take part in it), hoping that my year of graduation wouldn’t have been printed on the front.To my dismay, they did have it (very well pronounced).</p>

<p>Well that meant, I can’t actually take part in the event. Nevertheless I had spent some time thinking about it the previous day ,so I thought I will just make a small post on my ideas on the problem statement and how I would have approached it.</p>

<p>Of course I won’t spoil the fun for you. There will be no code at the bottom of this write up. So if you are looking for one, no luck here.</p>

<p>Here is the problem statement,</p>

<div class="text-center">
    <a class="b-captionImg" href="#" data-featherlight="/assets/posts/robotics/2016-09-28-iit-techfest-mesh-flare/meshflare-track.jpg">
        <img data-src="/assets/posts/robotics/2016-09-28-iit-techfest-mesh-flare/meshflare-track.jpg" class="img-responsive lazyload" alt="meshflare track" />
        
    </a>
</div>

<p>As always, you start at START and move through this maze and try to find your way to the big white square with the END below it. Now if you look at the track for a few seconds, you will observe that it has more than one loop in the track. This means, if you opt to use the all famous default-left or default right strategy, your robot is probably going to go in circles till it dies or the event coordinators kick you out. Honestly, the latter sounds more probable.</p>

<p>Now that can’t use conventional methods, how do we tackle this seemingly impossible problem statement?</p>

<p>Well it’s not going to be easy. But I can try to make it seem possible to a certain extent.</p>

<p>Your robot must,</p>

<ul>
  <li>be <a href="/line-follower-robot/">able to follow a line</a> (duh!)</li>
  <li>be able to <a href="/programming-line-follower-robot/">detect 189, 90 and 45 deg</a> direction changes. (not so tricky)</li>
  <li>be able keep a track of how far in space it has moved between any two points. (tricky)</li>
</ul>

<p>Now let’s take a closer look at the sample track that they have provided. There are certain points in the track where the robot has to make a decision. We will call these nodes ‘vertices’. Lets mark out all the vertices in the track.</p>

<div class="text-center">
    <a class="b-captionImg" href="#" data-featherlight="/assets/posts/robotics/2016-09-28-iit-techfest-mesh-flare/meshflare-vertices.jpg">
        <img data-src="/assets/posts/robotics/2016-09-28-iit-techfest-mesh-flare/meshflare-vertices.jpg" class="img-responsive lazyload" alt="meshflare vertices" />
        
    </a>
</div>

<p>Yes, dead ends are decision making points. START and END are also decision making points. Now, some of you may have already observed that there is some niceness in the way the nodes are arranged. This is not just coincidence. Therein lies your secret. Now we will try to overlay a grid on the above image and see if we can make any sense out of it.</p>

<div class="text-center">
    <a class="b-captionImg" href="#" data-featherlight="/assets/posts/robotics/2016-09-28-iit-techfest-mesh-flare/meshflare-grid.jpg">
        <img data-src="/assets/posts/robotics/2016-09-28-iit-techfest-mesh-flare/meshflare-grid.jpg" class="img-responsive lazyload" alt="meshflare grid" />
        
    </a>
</div>

<p>So, you can see that all the vertices can be made to fall on a grid and all motions happen from one of the 4 corners of each check on the grid. This check that we have defined here is going to be a single ‘unit-length’ on the arena. It’s up to you to define the resolution of this grid. Keep in mind that too much resolution is almost as bad as too little.</p>

<p>Now let’s think about what we have done so far. We managed to discretize the track into ‘unit-length’ checks and represent each check with an offset in space with (0,0) being the start vertex and (x,y) being the end vertex. This is a classic <a href="https://en.wikipedia.org/wiki/Directed_graph">weighted directed graph</a>.</p>

<p>Now you just have to perform a <a href="https://en.wikipedia.org/wiki/Depth-first_search">Depth First Search (DFS)</a> on the graph to arrive at the destination node. If you have made it to this point successfully, choosing the least weighted path to the destination vertex should be a cake walk.</p>

<p>All the best for anyone participating. Let me know if this was helpful.</p>]]></content><author><name>Siddharth</name><email>siddharth@embedjournal.com</email></author><category term="Robotics" /><category term="Tech Fest" /><category term="Programming" /><category term="Theory" /><summary type="html"><![CDATA[Over the past few days, I received a plethora of emails and messages on how to make a line follower robot. Mostly, the specification being white line on a black surface. Some even mentioned shortest path detection loops in the track. Now, I do get emails in which people ask me questions about line follower robots. Nope, thats not unusual (actually I get quite a lot).]]></summary></entry><entry><title type="html">GLEM: Graphical LCD Emulator in C</title><link href="https://embedjournal.com/glem-graphical-lcd-emulator-c/" rel="alternate" type="text/html" title="GLEM: Graphical LCD Emulator in C" /><published>2016-06-05T13:09:23+00:00</published><updated>2016-06-05T13:09:23+00:00</updated><id>https://embedjournal.com/glem-graphical-lcd-emulator-c</id><content type="html" xml:base="https://embedjournal.com/glem-graphical-lcd-emulator-c/"><![CDATA[<p>At some point in time we all have had to develop some sort of UI for our embedded devices. The thing about UI design is, it can take one hell of a time before we can get it right (and it’s a thankless job! I have my reasons).</p>

<p>I for one, hated (note past tense) glcd work. I always found reasons to postpone or push it off to one my co workers. Now don’t get me wrong here, I’m referring only to embedded UI design. I had two main reasons for this dislike,</p>

<ol>
  <li>The roundtrip time involved in flashing the device, and reflashing with the updated layout. This time may be significantly long if your code base is large.</li>
  <li>How ever good a programmer you are (IMHO), GLCD layer almost always looks bad after speed optimizations.</li>
</ol>

<p>Now I know I can’t do much about the second point. But with some thinking, I figured point one is actually addressable with only a couple of my Sundays!</p>

<p>So I spent some time to create an emulator that can take the glcd back plane and display it on a window on your desktop. So the round trip time is totally eliminated from the equation. I can’t say I really like it now, but I certainly don’t dislike it as much as I used too.</p>

<h3 id="how-it-works">How it works?</h3>

<p>A typical software architecture for GLCD will be as follows (at least that’s how I would have it). The app layer gets new data that has to be pushed into the GLCD. Then it calls refresh routine to make changes to a backplane. The physical layer then processes this information into a  bitmap and then calls a glcdWrite routine to flush the new data into the display RAM.</p>

<p>We will now introduce a small change in code flow that will do the magic. Just before the call to glcdWrite, a code macro is used to send the same data to the emulator instead of the actual GLCD.</p>

<p>The sequence is illustrated in the following image.</p>

<div class="text-center">
    <a class="b-captionImg" href="#" data-featherlight="/assets/posts/embedded/2016-06-05-glem-graphical-lcd-emulator-c/software-architecture.png">
        <img data-src="/assets/posts/embedded/2016-06-05-glem-graphical-lcd-emulator-c/software-architecture.png" class="img-responsive lazyload" alt="software architecture" />
        
    </a>
</div>

<h3 id="data-encoding">Data Encoding</h3>

<p>Most commercially available GLCDs are 1 bit per pixel packed into bytes in two different ways.</p>

<ol>
  <li>Row Major - MSB of first byte is pixel (0,0) and LSB is pixel (7,0). Second byte represents pixels (8,0) to (15,0) and so on.</li>
  <li>Column Major - MSB of first byte is pixel (0,0) and LSB is pixel (0,7). Second byte represents pixels (1,0) to (1,7) and so on.</li>
</ol>

<p>Therefore, the glcd buffer length would be, <code>buf_len = glcd_width/8 * glcd_height;</code>This buffer is what your embedded device sends out to the GLCD through the SPI/I2C bus and the glem server expects same buffer to render the image.</p>

<h3 id="installation">Installation:</h3>

<p>If you have any experience installing software in Linux, installing GLEM should be little/no trouble at all.</p>

<p>You can find the git upstream at <a href="https://github.com/EmbedJournal/glem">https://github.com/EmbedJournal/glem</a>.Clone this repository into your machine and follow the instructions in the README.md file to install it.</p>

<p>Once you have made the project, you will have to start the GLEM server with your GLCD’s width and height as arguments. For example if you have a 128x64 1bit GLCD, you should run,</p>

<div class="language-shell highlighter-rouge"><div class="highlight"><pre class="highlight"><code><span class="nv">$ </span>./glem serve 128 64
</code></pre></div></div>

<p>Now you should see a new window looking something like this (may not be identical as I may have made changes at some point that deviates from this article).</p>

<div class="text-center">
    <a class="b-captionImg" href="#" data-featherlight="/assets/posts/embedded/2016-06-05-glem-graphical-lcd-emulator-c/glem-screenshot.png">
        <img data-src="/assets/posts/embedded/2016-06-05-glem-graphical-lcd-emulator-c/glem-screenshot.png" class="img-responsive lazyload" alt="glem screenshot" />
        
    </a>
</div>

<p>The vertical lines have appeared because I wrote 0x55 to all display RAM. You can also run the following to test if GLEM server is working,</p>

<div class="language-shell highlighter-rouge"><div class="highlight"><pre class="highlight"><code><span class="nv">$ </span>./glem <span class="nb">test </span>128 64
</code></pre></div></div>

<p>To understand how to use it in your project, have a look at example.c in the src directory. It includes glcd.c which behaves as the physical layer for GLEM. You macro switch should redirect your SPI/I2C calls to this file.</p>

<p>Hope this was helpful. Leave your feedbacks in the comment sections.</p>]]></content><author><name>Siddharth</name><email>siddharth@embedjournal.com</email></author><category term="Embedded" /><category term="Tools" /><summary type="html"><![CDATA[At some point in time we all have had to develop some sort of UI for our embedded devices. The thing about UI design is, it can take one hell of a time before we can get it right (and it’s a thankless job! I have my reasons).]]></summary></entry><entry><title type="html">External Event Counter - Seven Segment Displays</title><link href="https://embedjournal.com/external-event-counter-seven-segment-displays/" rel="alternate" type="text/html" title="External Event Counter - Seven Segment Displays" /><published>2015-12-06T21:30:12+00:00</published><updated>2015-12-06T21:30:12+00:00</updated><id>https://embedjournal.com/external-event-counter-seven-segment-displays</id><content type="html" xml:base="https://embedjournal.com/external-event-counter-seven-segment-displays/"><![CDATA[<p>External event counters are pretty useful things to have around. Once I had a feud with a shopkeeper for selling 4 motors in 3 different RPMs. Well, I don’t know if you have ever tried making a robot that had wheels rotating at different speeds, I did. It wasn’t a very memorable experience.</p>

<p>A The shopkeeper agreed that the RPM on one of the motors was of a different RPM and other ‘slightly-off’ but the others where just fine. It took me a lot of time to convince him that his definition of ‘slight’ was just unacceptable.</p>

<p>Anyway, I brought that up because, external event counters can be used for a variety of reasons. One of them is to make your own tachometer (and I did it) to prove your argument in a street fight. But of-course you need to be jobless to start with.</p>

<p>In my previous post we discussed the basic <a href="/interface-7-segment-display-with-microcontroller/">interface seven segment displays</a> and how the concept of persistence of vision can be used to used to decrease the pin count of the embedded device.</p>

<p>Counters can either count up from zero or count down to zero. In the embedded space, down counter gives a marginal improvements in performance as most processors have a decrement and jump if not zero kind of instructions. But don’t worry, that was just “fun facts” you don’t have to worry about it. Your optimizing C compiler will take care that for you.</p>

<p>In this post, we will discuss a basic application of the concept that we discussed earlier and proceed along to make a physical counter that keeps track of an external event (key press).</p>

<p>First, we will take up the task to write different data into all the 4 digits of the 7 segment display. Let’s say we want to print 1234 on the display. Here is a flow chart that will help you better understand the concept of persistence of vision (POV).</p>

<div class="text-center">
    <a class="b-captionImg" href="#" data-featherlight="/assets/posts/microchip-pic/2015-12-06-external-event-counter-seven-segment-displays/pov-seven-segment-display.png">
        <img data-src="/assets/posts/microchip-pic/2015-12-06-external-event-counter-seven-segment-displays/pov-seven-segment-display.png" class="img-responsive lazyload" alt="pov seven segment display" />
        
    </a>
</div>

<p>So if you write 1 to the data bus and enable the first segment, you will have to do the first step. Likewise, write 2 to data bus and enable the second segment. Similarly do the third and fourth step. Once this cycle is finished, repeat the above steps at a frequency, for the sake of argument, lets say 50 Hz.</p>

<p>If you did it correctly, you should see a static 1234 appear over the 4 digits of the 7 segment display. This is how you should program the above logic.</p>

<div class="language-c highlighter-rouge"><div class="highlight"><pre class="highlight"><code><span class="cp">#include</span> <span class="cpf">&lt;xc.h&gt;</span><span class="cp">
#include</span> <span class="cpf">&lt;stdint.h&gt;</span><span class="cp">
#include</span> <span class="cpf">"delays.h"</span><span class="cp">
</span>
<span class="cp">#pragma config OSC=HS,WDT=OFF,FCMEN=ON,XINST=OFF,IESO=OFF,LVP=OFF
</span>
<span class="cm">/*
* Hardware connetions,
* PORT B is connected to the 7 segment display
* PORT c Pins 0, 1, 2 , 3, are used as enable pins for segments
*/</span>

<span class="kt">void</span> <span class="nf">main</span><span class="p">()</span>
<span class="p">{</span>
    <span class="kt">uint8_t</span> <span class="n">lookup</span><span class="p">[]</span> <span class="o">=</span> <span class="p">{</span>
        <span class="mh">0x3f</span><span class="p">,</span><span class="mh">0x06</span><span class="p">,</span><span class="mh">0x5b</span><span class="p">,</span><span class="mh">0x4f</span><span class="p">,</span><span class="mh">0x66</span><span class="p">,</span>
        <span class="mh">0x6d</span><span class="p">,</span><span class="mh">0x7d</span><span class="p">,</span><span class="mh">0x07</span><span class="p">,</span><span class="mh">0x7f</span><span class="p">,</span><span class="mh">0x6f</span>
    <span class="p">};</span>
    <span class="kt">int</span> <span class="n">idx</span><span class="p">,</span><span class="n">idy</span><span class="p">;</span>
    <span class="n">ADCON1</span><span class="o">=</span><span class="mh">0x0F</span><span class="p">;</span>
    <span class="n">TRISB</span> <span class="o">=</span> <span class="mh">0x00</span><span class="p">;</span>
    <span class="n">TRISC</span> <span class="o">=</span> <span class="mh">0x00</span><span class="p">;</span>
    <span class="k">while</span><span class="p">(</span><span class="mi">1</span><span class="p">)</span>
    <span class="p">{</span>
        <span class="n">idy</span><span class="o">=</span><span class="mh">0x08</span><span class="p">;</span>
        <span class="k">for</span><span class="p">(</span><span class="n">idx</span><span class="o">=</span><span class="mi">1</span><span class="p">;</span><span class="n">idx</span><span class="o">&lt;=</span><span class="mi">4</span><span class="p">;</span><span class="n">idx</span><span class="o">++</span><span class="p">){</span>
            <span class="n">LATB</span> <span class="o">=</span> <span class="n">lookup</span><span class="p">[</span><span class="n">idx</span><span class="p">];</span>
            <span class="n">LATC</span> <span class="o">=</span> <span class="n">idy</span><span class="p">;</span>
            <span class="n">idy</span> <span class="o">=</span> <span class="n">idy</span> <span class="o">&gt;&gt;</span> <span class="mi">1</span><span class="p">;</span>
            <span class="n">dealy_ms</span><span class="p">(</span><span class="mi">5</span><span class="p">);</span>
        <span class="p">}</span>
    <span class="p">}</span>
<span class="p">}</span>
</code></pre></div></div>

<p>Here is a small video that I made to demonstrate the working of the above procedure.</p>

<iframe class="b-youtubeVideo" src="https://www.youtube.com/embed/IpFqXNPH1NU" frameborder="0" allowfullscreen="">
</iframe>

<h3 id="event-counter">Event Counter</h3>

<p>Now that the persistence of vision section has been dealt with, we can get started with the counter. For this post we will use a micro switch for providing the input to the microcontroller. But in practical application any digital input (such as that from a IR interruption system) can be used to increment the counter.</p>

<p>Here is a flowchart to help you understand the working of the counter. Since the controller runs endlessly in a while(1) loop, there is not Stop block in the flowchart.</p>

<div class="text-center">
    <a class="b-captionImg" href="#" data-featherlight="/assets/posts/microchip-pic/2015-12-06-external-event-counter-seven-segment-displays/flowchart.png">
        <img data-src="/assets/posts/microchip-pic/2015-12-06-external-event-counter-seven-segment-displays/flowchart.png" class="img-responsive lazyload" alt="flowchart" />
        
    </a>
</div>

<p>In the main function, the controller first checks if there is a counter overflow condition. If there is overflow, it will reset it back to 0. After this it tests the state of the input switch. If the switch is pressed, it increments the counter. After this, it send the value of the counter to the seg_wrt() function to write the data to the display.</p>

<p>Here is a program to implement the above logic in embedded C.</p>

<div class="language-c highlighter-rouge"><div class="highlight"><pre class="highlight"><code><span class="cp">#include</span> <span class="cpf">&lt;xc.h&gt;</span><span class="cp">
#include</span> <span class="cpf">&lt;stdint.h&gt;</span><span class="cp">
#include</span> <span class="cpf">"delays.h"</span><span class="cp">
</span>
<span class="cp">#pragma config OSC = HS,WDT=OFF,FCMEN=ON,XINST=OFF,IESO=OFF,LVP=OFF
</span>
<span class="cm">/*Macro For Segment Enable Pins*/</span>
<span class="cp">#define SEG_EN1 LATCbits.LATC1
#define SEG_EN2 LATCbits.LATC0
#define SWITCH PORTDbits.RD0
</span>
<span class="kt">void</span> <span class="nf">seg_wrt</span><span class="p">(</span><span class="kt">unsigned</span> <span class="kt">char</span><span class="p">);</span>

<span class="kt">void</span> <span class="nf">main</span><span class="p">()</span>
<span class="p">{</span>
    <span class="kt">unsigned</span> <span class="kt">char</span> <span class="n">ctr</span> <span class="o">=</span> <span class="mi">0</span><span class="p">;</span> <span class="c1">// Counter variable</span>
    <span class="n">ADCON1</span> <span class="o">=</span> <span class="mh">0x0F</span><span class="p">;</span> <span class="c1">// Make all pins Digital</span>
    <span class="n">TRISC</span> <span class="o">=</span> <span class="mh">0x00</span><span class="p">;</span> <span class="c1">// Enable Pins</span>
    <span class="n">TRISB</span> <span class="o">=</span> <span class="mh">0x00</span><span class="p">;</span>
    <span class="n">TRISD</span> <span class="o">=</span> <span class="mh">0x0F</span><span class="p">;</span> <span class="c1">// 7 segment data Port</span>
    <span class="k">while</span><span class="p">(</span><span class="mi">1</span><span class="p">)</span> <span class="p">{</span>
        <span class="k">if</span> <span class="p">(</span><span class="n">ctr</span><span class="o">%</span><span class="mi">99</span> <span class="o">==</span> <span class="mi">0</span><span class="p">)</span>
            <span class="n">ctr</span> <span class="o">=</span> <span class="mi">0</span><span class="p">;</span>        <span class="c1">// reset the counter if it reaches 100</span>
        <span class="k">if</span> <span class="p">(</span><span class="n">SWITCH</span> <span class="o">==</span> <span class="mi">1</span><span class="p">)</span> <span class="p">{</span>
            <span class="c1">// In here if switch pressed.</span>
            <span class="n">ctr</span><span class="o">++</span><span class="p">;</span>          <span class="c1">// increment the counter.</span>
            <span class="n">delay_ms</span><span class="p">(</span><span class="mi">20</span><span class="p">);</span>   <span class="c1">// bebounce the press.</span>
        <span class="p">}</span>
        <span class="n">seg_wrt</span><span class="p">(</span><span class="n">ctr</span><span class="p">);</span>
    <span class="p">}</span>
<span class="p">}</span>

<span class="cm">/*Function to write data in the 7 segment display*/</span>
<span class="kt">void</span> <span class="nf">seg_wrt</span><span class="p">(</span><span class="kt">unsigned</span> <span class="kt">char</span> <span class="n">val</span><span class="p">)</span>
<span class="p">{</span>
    <span class="kt">uint8_t</span> <span class="n">lookup</span><span class="p">[]</span> <span class="o">=</span> <span class="p">{</span>
        <span class="mh">0x3f</span><span class="p">,</span><span class="mh">0x06</span><span class="p">,</span><span class="mh">0x5b</span><span class="p">,</span><span class="mh">0x4f</span><span class="p">,</span><span class="mh">0x66</span><span class="p">,</span>
        <span class="mh">0x6d</span><span class="p">,</span><span class="mh">0x7d</span><span class="p">,</span><span class="mh">0x07</span><span class="p">,</span><span class="mh">0x7f</span><span class="p">,</span><span class="mh">0x6f</span>
    <span class="p">};</span>
    <span class="kt">int</span> <span class="n">unit</span><span class="p">,</span><span class="n">ten</span><span class="p">;</span>
    <span class="kt">int</span> <span class="n">idx</span> <span class="o">=</span> <span class="mi">0</span><span class="p">;</span>
    <span class="n">unit</span> <span class="o">=</span> <span class="n">val</span><span class="o">/</span><span class="mi">10</span><span class="p">;</span> <span class="c1">// separate the two digit data into units and tens</span>
    <span class="n">ten</span> <span class="o">=</span> <span class="n">val</span><span class="o">%</span><span class="mi">10</span><span class="p">;</span>
    <span class="k">for</span><span class="p">(</span><span class="n">idx</span><span class="o">=</span><span class="mi">0</span><span class="p">;</span><span class="n">idx</span><span class="o">&lt;</span><span class="mi">1000</span><span class="p">;</span> <span class="n">idx</span><span class="o">++</span><span class="p">)</span> <span class="p">{</span>
        <span class="n">LATB</span> <span class="o">=</span> <span class="n">lookup</span><span class="p">[</span><span class="n">unit</span><span class="p">];</span> <span class="c1">// write the units place</span>
        <span class="n">SEG_EN1</span> <span class="o">=</span> <span class="mi">1</span><span class="p">;</span> <span class="c1">// Segment 1 ON</span>
        <span class="n">delay_ms</span><span class="p">(</span><span class="mi">10</span><span class="p">);</span>
        <span class="n">SEG_EN1</span> <span class="o">=</span> <span class="mi">0</span><span class="p">;</span> <span class="c1">// Segment 1 OFF</span>

        <span class="n">LATB</span> <span class="o">=</span> <span class="n">lookup</span><span class="p">[</span><span class="n">ten</span><span class="p">];</span> <span class="c1">// write the tens place</span>
        <span class="n">SEG_EN2</span> <span class="o">=</span> <span class="mi">1</span><span class="p">;</span> <span class="c1">// Segment 2 ON</span>
        <span class="n">delay_ms</span><span class="p">(</span><span class="mi">10</span><span class="p">);</span>
        <span class="n">SEG_EN2</span> <span class="o">=</span> <span class="mi">0</span><span class="p">;</span> <span class="c1">// Segment 2 OFF</span>
    <span class="p">}</span>
<span class="p">}</span>
</code></pre></div></div>

<p>Here is a demonstration of the above procedure,</p>

<iframe class="b-youtubeVideo" src="https://www.youtube.com/embed/7EUbdQuakY4" frameborder="0" allowfullscreen="">
</iframe>

<p>I hope this post was helpful in understanding the interface of 7 Segment Displays and how they can be used to display numeric data. In the upcoming posts we will start working with these displays to make some real projects.</p>

<p><strong>Edit History</strong>:</p>

<ul>
  <li>Article first published 15th Aug 2013</li>
  <li>Code updated to xc8 compiler and republished 6th Dec 2015</li>
</ul>]]></content><author><name>Siddharth</name><email>siddharth@embedjournal.com</email></author><category term="Microchip PIC" /><category term="Interface" /><category term="Theory" /><summary type="html"><![CDATA[External event counters are pretty useful things to have around. Once I had a feud with a shopkeeper for selling 4 motors in 3 different RPMs. Well, I don’t know if you have ever tried making a robot that had wheels rotating at different speeds, I did. It wasn’t a very memorable experience.]]></summary></entry><entry><title type="html">Compiling and Deploying BeagleBone Black Kernel</title><link href="https://embedjournal.com/kernel-compilation-beaglebone-black/" rel="alternate" type="text/html" title="Compiling and Deploying BeagleBone Black Kernel" /><published>2015-10-05T05:17:14+00:00</published><updated>2015-10-05T05:17:14+00:00</updated><id>https://embedjournal.com/kernel-compilation-beaglebone-black</id><content type="html" xml:base="https://embedjournal.com/kernel-compilation-beaglebone-black/"><![CDATA[<p>It’s been a while since I wrote my first article and though I need to come up with something a little more advanced this time, something which will be perfect for the die-hard Linux users and those who await to get their hands dirty with some kernel grease.</p>

<p>For the sake of this discussion,it is assumed that you have some working knowledge of the Linux operating systems (at least as a user). Needless to say you should have a working bone to follow this tutorial.</p>

<div id="section-nav">
  <h3>Table of Contents</h3>
<ul id="markdown-toc">
  <li><a href="#beaglebone-black" id="markdown-toc-beaglebone-black">BeagleBone Black</a>    <ul>
      <li><a href="#why-deploy-a-custom-kernel" id="markdown-toc-why-deploy-a-custom-kernel">Why deploy a custom kernel?</a></li>
      <li><a href="#tools-needed-to-get-started" id="markdown-toc-tools-needed-to-get-started">Tools needed to get started</a></li>
    </ul>
  </li>
  <li><a href="#installing-arm-cross-compiler-toolchain" id="markdown-toc-installing-arm-cross-compiler-toolchain">Installing ARM cross compiler toolchain</a></li>
  <li><a href="#u-boot" id="markdown-toc-u-boot">U-boot</a>    <ul>
      <li><a href="#clone-u-boot-optional" id="markdown-toc-clone-u-boot-optional">Clone U-boot (Optional)</a></li>
      <li><a href="#compile-u-boot-optional" id="markdown-toc-compile-u-boot-optional">Compile U-boot (Optional)</a></li>
    </ul>
  </li>
  <li><a href="#building-a-kernel-for-beaglebone-black" id="markdown-toc-building-a-kernel-for-beaglebone-black">Building a kernel for beaglebone black</a>    <ul>
      <li><a href="#cloning-the-kernel" id="markdown-toc-cloning-the-kernel">Cloning the Kernel</a></li>
      <li><a href="#formatting-the-sd-card" id="markdown-toc-formatting-the-sd-card">Formatting the SD card</a></li>
      <li><a href="#compile-linux-kernel" id="markdown-toc-compile-linux-kernel">Compile Linux kernel</a></li>
      <li><a href="#root-file-system-rfs" id="markdown-toc-root-file-system-rfs">Root File System (RFS)</a></li>
      <li><a href="#install-kernel-modules" id="markdown-toc-install-kernel-modules">Install Kernel Modules</a></li>
    </ul>
  </li>
</ul>

</div>

<h2 id="beaglebone-black">BeagleBone Black</h2>

<p>BeagleBone Black (BBB), is a popular Single Board Computer (SBC) which was released as a successor to the <a href="/beaglebone-a-quick-review/">BeagleBone or BeagleBone White</a>. If you don’t have a BBB, just order one to dive into the world of Embedded Linux. I’m sure that BBB will occupy a special place in your electronics hardware inventory :-).</p>

<h3 id="why-deploy-a-custom-kernel">Why deploy a custom kernel?</h3>

<p>Well, I know that this question will be itching your mind. Instead of using the pre-built image, why should we use this method of building our own image and RFS? The answer for this question is, you have to do this in order to get some fun out of BeagleBone. Electronics is fun when you start doing things of your own and also you will learn a lot of things while doing this.</p>

<p>For starters, I would strongly recommend to use the pre-built image for working with BeagleBone. But, as I already stated, this post is for the intermediate level users of BBB. This will be cool when you do this and I’m sure this will guide you into the real world of Embedded Linux.</p>

<h3 id="tools-needed-to-get-started">Tools needed to get started</h3>

<p>For building linux kernel you will need several tools other than BeagleBone. The tools which are required is listed below:</p>

<ul>
  <li>A PC/Laptop with a flavor of Linux (Preferably Ubuntu 14.04)</li>
  <li>Linux kernel source for BeagleBone Black</li>
  <li>ARM cross compiler</li>
  <li>U-Boot(optional)</li>
  <li>mkimage</li>
</ul>

<h2 id="installing-arm-cross-compiler-toolchain">Installing ARM cross compiler toolchain</h2>

<p>The first and foremost thing in compiling kernel is installing ARM gcc cross compiler. Since, BeagleBone Black is based on AM335x Sitara Processor, we need to compile the kernel for that environment. There are numerous compilers available online for free but it is important to install a stable one for proper compilation. For instance gcc-arm-linux-gnueabihf compiler available in standard Ubuntu package is an unstable one. So, download a stable compiler. The preferred one is Linaro cross compiler.</p>

<p>You can download the compiler <a href="http://releases.linaro.org/components/toolchain/binaries/5.4-2017.05/arm-linux-gnueabihf/">here</a></p>

<p>After downloading, extract the compiler using the following command.</p>

<div class="language-shell highlighter-rouge"><div class="highlight"><pre class="highlight"><code><span class="nv">$ </span><span class="nb">sudo tar </span>xvf gcc-linaro-arm-linux-gnueabihf-4.8-2014.04_linux.tar.xz <span class="nt">-C</span> /opt/
</code></pre></div></div>

<p>The compiler will be extracted to /opt/ directory. opt is nothing but the optional directory. Next, step is to add the compiler to the PATH variable, in order to direct the shell to find our compiler.</p>

<p>Go to /opt/ directory and change the directory name for adaptivity. Then, add the compiler to PATH variable.</p>

<div class="language-shell highlighter-rouge"><div class="highlight"><pre class="highlight"><code><span class="nv">$ </span><span class="nb">cd</span> /opt/
<span class="nv">$ </span><span class="nb">sudo mv </span>gcc-linaro-arm-linux-gnueabihf-4.8-2014.04_linux/ gcc-arm-linux
<span class="nv">$ </span><span class="nb">export </span><span class="nv">PATH</span><span class="o">=</span><span class="nv">$PATH</span>:/opt/gcc-arm-linux/bin
</code></pre></div></div>

<p>After installing the compiler you can verify it using the following command,</p>

<div class="language-shell highlighter-rouge"><div class="highlight"><pre class="highlight"><code><span class="nv">$ </span>arm-linux-gnueabihf-gcc <span class="nt">--version</span>
arm-linux-gnueabihf-gcc <span class="o">(</span>crosstool-NG linaro-1.13.1-4.8-2014.04 - Linaro GCC 4.8-2014.04<span class="o">)</span> 4.8.3 20140401 <span class="o">(</span>prerelease<span class="o">)</span>
</code></pre></div></div>

<h2 id="u-boot">U-boot</h2>

<p>U-boot is an open source universal bootloader for Linux systems. It supports features like TFTP, DHCP, NFS etc… In order to boot the kernel, a valid kernel image (uImage) is required.</p>

<p>It is not possible to explain u-boot here, as it is beyond the scope of this post. So, we will see how to produce a bootable image using U-boot. You can either follow the below steps to compile your own U-boot image or you could just get a prebuilt image.</p>

<h3 id="clone-u-boot-optional">Clone U-boot (Optional)</h3>

<p>Clone u-boot using the following command</p>

<div class="language-shell highlighter-rouge"><div class="highlight"><pre class="highlight"><code><span class="nv">$ </span>git clone git://git.denx.de/u-boot.git u-boot/
</code></pre></div></div>

<h3 id="compile-u-boot-optional">Compile U-boot (Optional)</h3>

<p>Before, compiling U-Boot we need to configure it. Thanks to the availability of configuration files in the configs/ directory under u-boot. We can configure using the am332x_boneblack_defconfig file. All the configuration will be written to .config file located in u-boot/ directory. By default you will not be able to view the .config file. To view give ls -a command.</p>

<div class="language-shell highlighter-rouge"><div class="highlight"><pre class="highlight"><code><span class="nv">$ </span><span class="nb">cd </span>u-boot
<span class="nv">$ </span>make <span class="nv">ARCH</span><span class="o">=</span>arm <span class="nv">CROSS_COMPILE</span><span class="o">=</span>arm-linux-gnueabihf- am335x_boneblack_defconfig
</code></pre></div></div>

<p>After configuring, u-boot can be cross compiled using the following command.</p>

<div class="language-shell highlighter-rouge"><div class="highlight"><pre class="highlight"><code><span class="nv">$ </span>make <span class="nv">ARCH</span><span class="o">=</span>arm <span class="nv">CROSS_COMPILE</span><span class="o">=</span>arm-linux-gnueabihf-
</code></pre></div></div>

<p>It will take around 10 to 15 minutes depending on the system configuration. Mine is Pentium dual core processor and it took 10 minutes for compilation. After successful compilation, several files will be produced in u-boot/ directory. Our prime concern is MLO and u-boot.img files.</p>

<p>For now, we will not use the above mentioned files for booting. But, during later stages those will be needed.</p>

<h2 id="building-a-kernel-for-beaglebone-black">Building a kernel for beaglebone black</h2>

<p>Building a custom kernel for beaglebone black involves the following steps. Feel free to jump to the step you are currently in if you are not looking for a step-by-step guide.</p>

<h3 id="cloning-the-kernel">Cloning the Kernel</h3>

<p>After installing the compiler, clone the kernel source for BeagleBone Black from GitHub using</p>

<div class="language-shell highlighter-rouge"><div class="highlight"><pre class="highlight"><code><span class="nv">$ </span>git clone https://github.com/beagleboard/linux.git
</code></pre></div></div>

<p>Go to the linux directory and ensure that you have cloned the correct repo by executing the following command</p>

<div class="language-shell highlighter-rouge"><div class="highlight"><pre class="highlight"><code><span class="nv">$ </span><span class="nb">cd </span>linux
<span class="nv">$ </span>git remote <span class="nt">-v</span>
origin https://github.com/beagleboard/linux.git <span class="o">(</span>fetch<span class="o">)</span>
origin https://github.com/beagleboard/linux.git <span class="o">(</span>push<span class="o">)</span>
</code></pre></div></div>

<h3 id="formatting-the-sd-card">Formatting the SD card</h3>

<p>For deploying kernel from sd card, we need to format it and place the files accordingly. For this process, “Gparted” tool is needed. Install Gparted by the following command.</p>

<div class="language-shell highlighter-rouge"><div class="highlight"><pre class="highlight"><code><span class="nv">$ </span><span class="nb">sudo </span>apt-get <span class="nb">install </span>gparted
</code></pre></div></div>

<p>Insert your sd card by means of card reader and open Gparted. Select your sd card from the top right corner. it will be something like this, “/dev/sdb”</p>

<p><strong>Note:</strong> Always use sd card of size greater than 2 GB. Although, 500 MB is more than enough for our task, having large free space will come handy at times.</p>

<p>Right click on the rectangular area showing your sd card name and select unmount as we need to unmount the existing partitions. Then, delete the existing partitions by again right clicking and selecting “delete”. This will delete all your files in sd card, so make sure you backed up any important files. We need two partitions in order to boot the kernel, one is for storing the bootable images and another one is for storing the minimal RFS(Root File System). Select new option by right clicking the partitions and provide the following details:</p>

<ul>
  <li>New size: 50MBembed journal</li>
  <li>File System: FAT32</li>
  <li>Label: BOOT</li>
</ul>

<p>Click Add button. Then, create another partition for storing RFS by entering the options below</p>

<ul>
  <li>New Size: 1000MB</li>
  <li>File System: EXT3</li>
  <li>Label: RFS</li>
</ul>

<p>Finally, click the green tick mark at the menu bar. The partition will be created and you can see two partitions created as BOOT and RFS.</p>

<h3 id="compile-linux-kernel">Compile Linux kernel</h3>

<p>Before compiling the kernel we need to configure it. It will be hard for the newbies. Once again, thanks to the kernel developers for providing all configurations in a single file. Go to the kernel directory and issue the following command.</p>

<div class="language-shell highlighter-rouge"><div class="highlight"><pre class="highlight"><code><span class="nv">$ </span><span class="nb">sudo </span>make <span class="nv">ARCH</span><span class="o">=</span>arm <span class="nv">CROSS_COMPILE</span><span class="o">=</span>arm-linux-gnueabihf- bb.org_defconfig
</code></pre></div></div>

<p>This will write the configurations in file bb.org_defconfig to .config file.</p>

<p>Then compile the kernel.</p>

<div class="language-shell highlighter-rouge"><div class="highlight"><pre class="highlight"><code><span class="nv">$ </span><span class="nb">sudo </span>make <span class="nv">ARCH</span><span class="o">=</span>arm <span class="nv">CROSS_COMPILE</span><span class="o">=</span>arm-linux-gnueabihf- uImage dtbs <span class="nv">LOADADDR</span><span class="o">=</span>0x80008000 <span class="nt">-j4</span>
</code></pre></div></div>

<p>The above command will compile the kernel using the arm cross compiler having the load address as 80008000. “j4” corresponds to the number of process to be run during the compilation. Give the value as twice that of your cpu core. Mine is dual core, so I it gave as 4.</p>

<p>After compiling you can find the image files in “arch/arm/boot/” directory. Copy “uImage” file from this directory and also “am335x-boneblack.dtb” file from “arch/arm/boot/dts/” directory to the BOOT partition.</p>

<p>Then, create a file named as “uEnv.txt” in BOOT partition and copy the following code to it.</p>

<div class="language-shell highlighter-rouge"><div class="highlight"><pre class="highlight"><code><span class="nv">console</span><span class="o">=</span>ttyS0,115200n8
<span class="nv">netargs</span><span class="o">=</span>setenv bootargs <span class="nv">console</span><span class="o">=</span>ttyO0,115200n8 <span class="nv">root</span><span class="o">=</span>/dev/mmcblk0p2 ro <span class="nv">rootfstype</span><span class="o">=</span>ext4 rootwait debug earlyprintk <span class="nv">mem</span><span class="o">=</span>512M
<span class="nv">netboot</span><span class="o">=</span><span class="nb">echo </span>Booting from microSD ...<span class="p">;</span> setenv autoload no <span class="p">;</span> load mmc 0:1 <span class="k">${</span><span class="nv">loadaddr</span><span class="k">}</span> uImage <span class="p">;</span> load mmc 0:1 <span class="k">${</span><span class="nv">fdtaddr</span><span class="k">}</span> am335x-boneblack.dtb <span class="p">;</span> run netargs <span class="p">;</span> bootm <span class="k">${</span><span class="nv">loadaddr</span><span class="k">}</span> - <span class="k">${</span><span class="nv">fdtaddr</span><span class="k">}</span>
<span class="nv">uenvcmd</span><span class="o">=</span>run netboot
</code></pre></div></div>

<p>This will be the file in which uboot will look upon while booting. The instructions in this file will make the uboot to boot from our kernel.</p>

<p>After completing the above steps you can find the following files in BOOT partition of sd card.</p>

<ul>
  <li>uImage</li>
  <li>am335x-boneblack.dtb</li>
  <li>uEnv.txt</li>
</ul>

<p><strong>Note:</strong> Make sure you have installed mkimage tool and mounted the sd card.</p>

<h3 id="root-file-system-rfs">Root File System (RFS)</h3>

<p>You can download RFS <a href="https://www.dropbox.com/s/k93doprl261hwn2/rootfs.tar.xz?dl=0">here</a>.</p>

<p>Instead of downloading RFS, we can create our own <a href="/custom-rfs-beaglebone-black/">custom RFS using BusyBox</a>, which is an elaborate process and hence merits the need for a separate post. For the sake of simplicity, we can download and uncompress the RFS.</p>

<div class="language-shell highlighter-rouge"><div class="highlight"><pre class="highlight"><code><span class="nv">$ </span><span class="nb">sudo tar</span> <span class="nt">-xvf</span> rootfs.tar.xz <span class="nt">-C</span> /media/mani/RFS/
<span class="nv">$ </span><span class="nb">cd</span> /media/mani/RFS/rootfs/
<span class="nv">$ </span><span class="nb">sudo mv</span> ./<span class="k">*</span> ../
<span class="nv">$ </span><span class="nb">cd</span> ../
<span class="nv">$ </span><span class="nb">sudo rmdir </span>rootfs
</code></pre></div></div>

<p>The above command will uncompress the tar file and will place it in the RFS partition of SD card. Just replace “mani” with your username in the above command.</p>

<h3 id="install-kernel-modules">Install Kernel Modules</h3>

<p>We need modules for proper working of the kernel. So, install the kernel modules by the following command.</p>

<div class="language-shell highlighter-rouge"><div class="highlight"><pre class="highlight"><code><span class="nv">$ </span><span class="nb">sudo </span>make <span class="nv">ARCH</span><span class="o">=</span>arm <span class="nv">CROSS_COMPILE</span><span class="o">=</span>arm-linux-gnueabihf- <span class="nt">-j4</span> modules
<span class="nv">$ </span><span class="nb">sudo </span>make <span class="nv">ARCH</span><span class="o">=</span>arm <span class="nv">CROSS_COMPILE</span><span class="o">=</span>arm-linux-gnueabihf- <span class="nv">INSTALL_MOD_PATH</span><span class="o">=</span>/media/mani/RFS/ modules_install
</code></pre></div></div>

<p>That’s it. After completing the above steps, remove the SD card and place it in your BeagleBone. Connect the Bone to your PC via USB to serial converter and open the serial console using minicom in PC. (Set baud rate as 115200). After ensuring all things are correct, power on your BBB while holding the Boot switch (SW2). It will boot from your own custom kernel. Now you can cherish that you have created your own kernel image and deployed it in BeagleBone Black!!!</p>

<p>In my next post I will show you <a href="/custom-rfs-beaglebone-black/">how to create custom RFS using BusyBox</a>. As always, if you encountered any troubles on the way, just throw it in the comments, we will try to figure it out.</p>]]></content><author><name>Mani</name><email>manivannan@embedjournal.com</email></author><category term="Linux" /><category term="Beagle Bone" /><category term="XCompile" /><summary type="html"><![CDATA[It’s been a while since I wrote my first article and though I need to come up with something a little more advanced this time, something which will be perfect for the die-hard Linux users and those who await to get their hands dirty with some kernel grease.]]></summary></entry></feed>